今天来部署 Zabbix 来监控我的服务器;
Zabbix 官网手册:https://www.zabbix.com/cn/manuals ;其中 LTS(Long Term Support)是长期支持版本。
我们的服务器环境依旧是 CentOS Stream 8 ,安装 Zabbix 的版本是 4.0 LTS
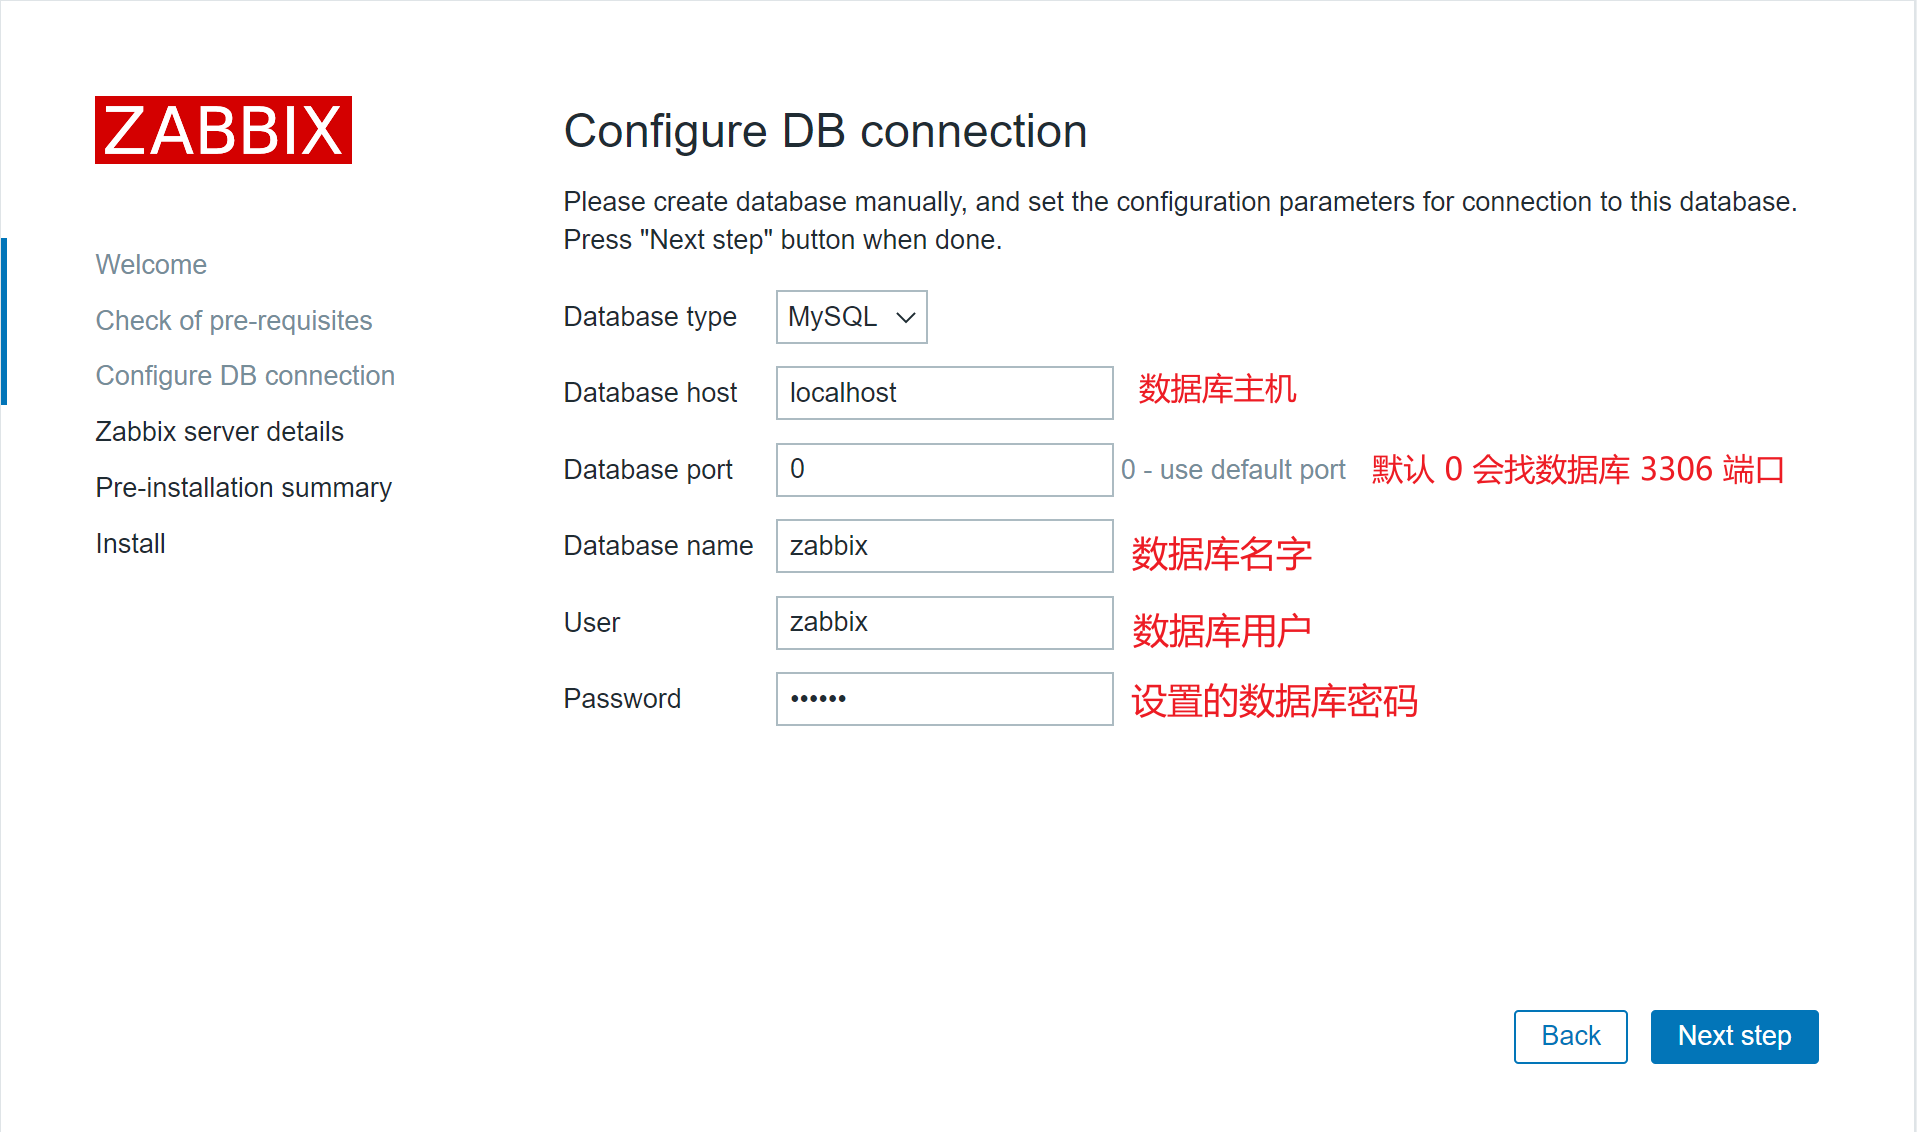
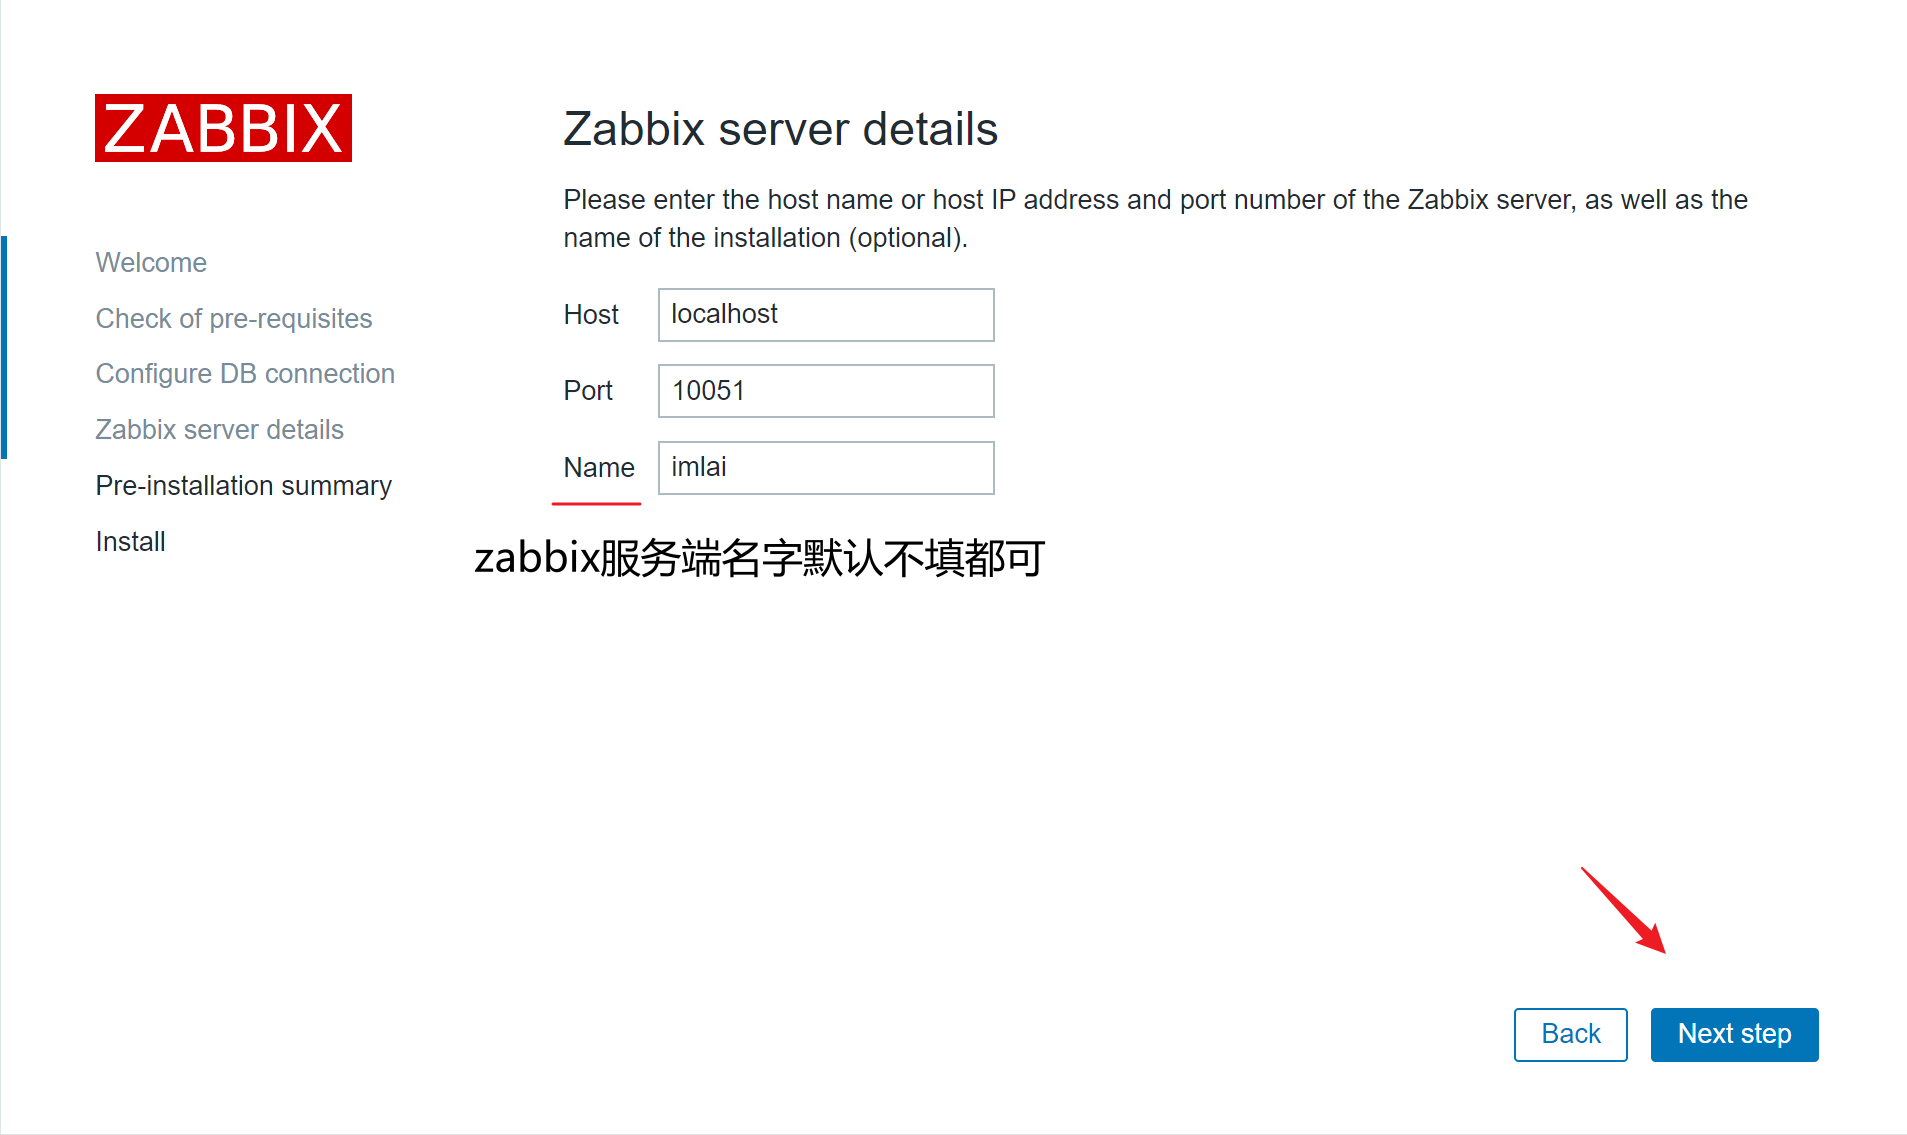
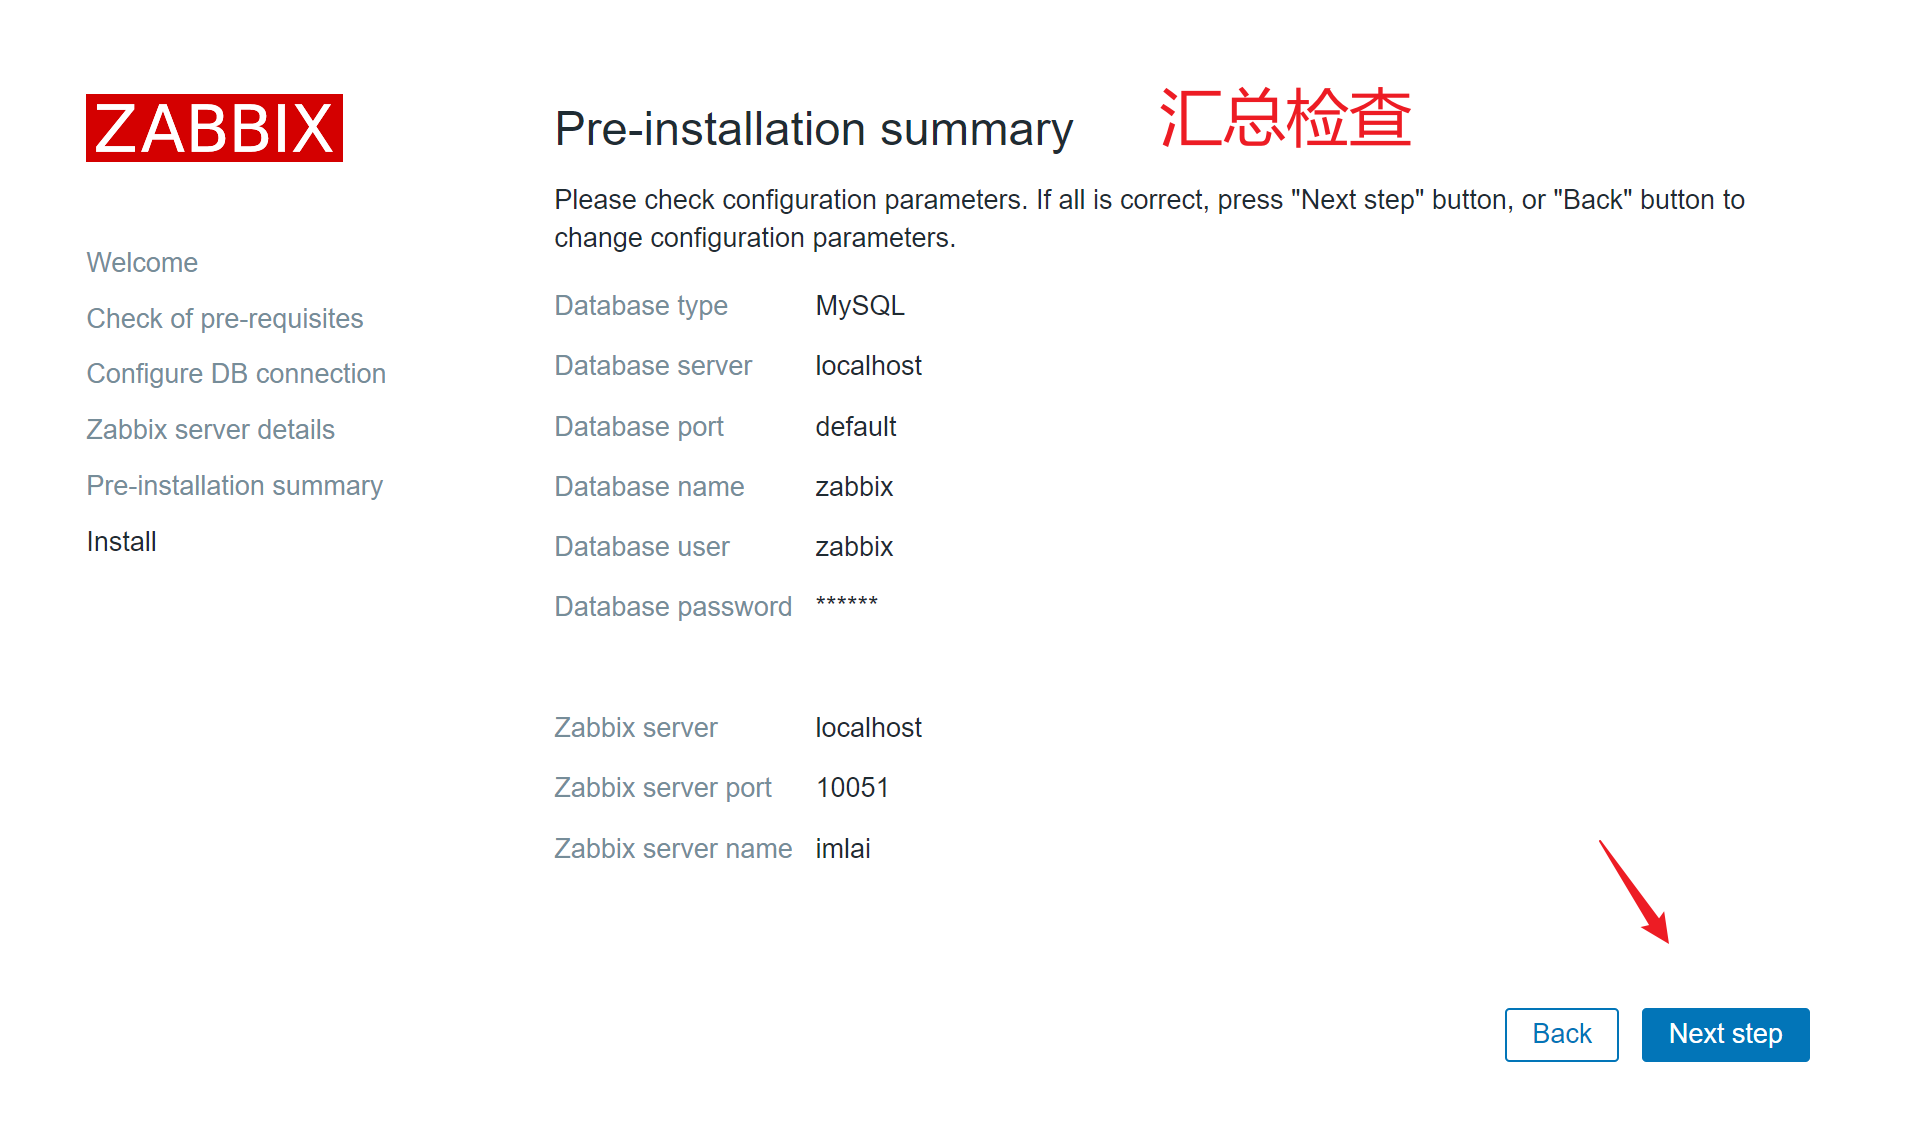
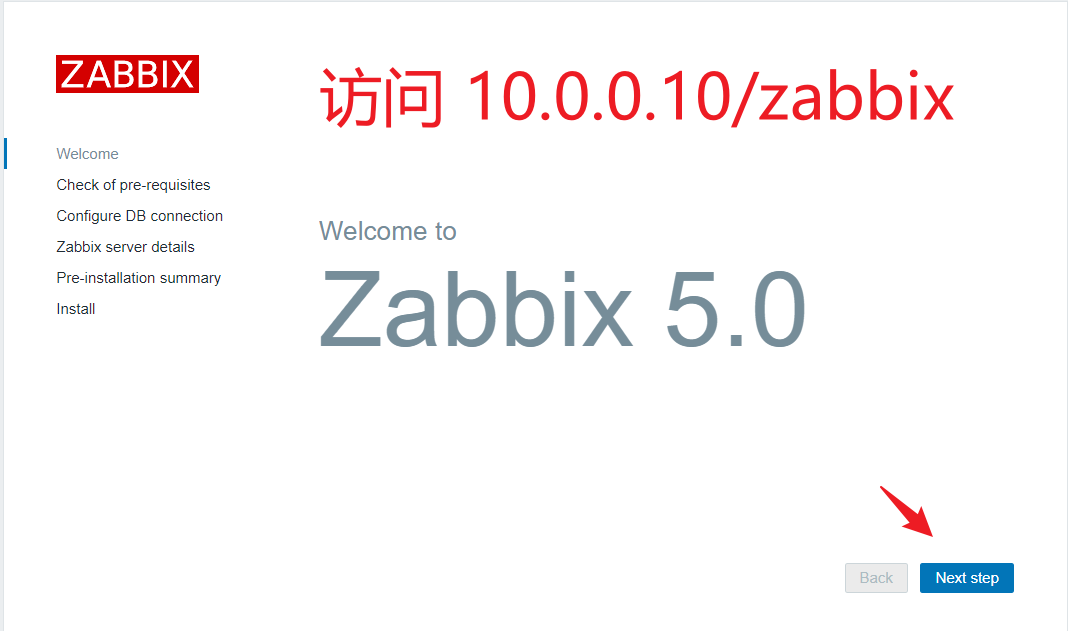
安装 zabbix 4.0 版本 服务端部署流程 1 2 3 4 5 6 7 8 9 10 11 12 13 14 15 16 17 18 19 20 21 22 23 24 25 26 27 28 29 30 31 32 33 34 35 36 37 38 39 40 41 42 43 44 45 46 47 48 49 50 51 52 53 54 55 56 57 58 59 60 61 62 63 64 65 66 67 68 69 70 71 72 73 74 75 76 77 78 79 80 81 82 83 84 85 86 87 88 89 90 91 92 93 94 95 96 97 98 99 100 101 102 103 104 105 106 107 108 1.安装zabbix.repo仓库文件,清华源的zabbix4版本(如果是其它操作系统,则选择对应版本的rpm包) [root@stream8 ~] 此时,yum仓库会多一个zabbix.repo文件 [root@stream8 ~] [zabbix] name=Zabbix Official Repository - $basearch baseurl=http://repo.zabbix.com/zabbix/4.0/rhel/8/$basearch / enabled=1 gpgcheck=1 gpgkey=file:///etc/pki/rpm-gpg/RPM-GPG-KEY-ZABBIX-A14FE591 [zabbix-non-supported] name=Zabbix Official Repository non-supported - $basearch baseurl=http://repo.zabbix.com/non-supported/rhel/8/$basearch / enabled=1 gpgkey=file:///etc/pki/rpm-gpg/RPM-GPG-KEY-ZABBIX gpgcheck=1 替换zabbix的来源路径为清华的源(因为zabbix官网的服务器在国外) [root@stream8 ~] 2.安装zabbix服务端(前端)、zabbix连接数据库、zabbix-agent(客户端) [root@stream8 ~] 启动mariadb数据库,设置开机自启 [root@stream8 ~] 3.设置mariadb数据库密码(默认账号是root),创建zabbix库(设置字符集是utf8),存储监控数据,且创建账号 [root@stream8 ~] [root@stream8 ~] [root@stream8 ~] 测试zabbix用户 [root@stream8 ~] +--------------------+ | Database | +--------------------+ | information_schema | | mysql | | performance_schema | | zabbix | +--------------------+ 4.导入zabbix的数据库 这里因为Stream8版本原因,zcat读取create.sql.gz会报错"导入的数据行太长了" ,修改一下mysql的配置文件并重启服务即可解决; [root@stream8 ~] ...添加下几行 [mysqld] innodb_strict_mode = 0 [root@stream8 ~] [root@stream8 ~] 查看导入zabbix数据库的表; [root@stream8 ~] ... | users | | users_groups | | usrgrp | | valuemaps | | widget | | widget_field | +----------------------------+ 5. 编辑zabbix-server服务端配置文件(修改数据库部分即可) [root@stream8 ~] ... DBHost=localhost 启动,指定为本机 DBPassword=redhat 开启,设置zabbix数据库密码 修改完,也可以直接替换源文件为以下有效的内容,直观明了 [root@stream8 ~] LogFile=/var/log/zabbix/zabbix_server.log LogFileSize=0 PidFile=/var/run/zabbix/zabbix_server.pid SocketDir=/var/run/zabbix DBHost=localhost DBName=zabbix DBUser=zabbix DBPassword=redhat SNMPTrapperFile=/var/log/snmptrap/snmptrap.log Timeout=4 AlertScriptsPath=/usr/lib/zabbix/alertscripts ExternalScripts=/usr/lib/zabbix/externalscripts LogSlowQueries=3000 6.启动zabbix服务,且开机自启 [root@stream8 ~] 7.检查zabbix(zabbix服务端的端口'10051' ) [root@stream8 ~] Active Internet connections (only servers) Proto Recv-Q Send-Q Local Address Foreign Address State PID/Program name tcp 0 0 0.0.0.0:22 0.0.0.0:* LISTEN 1131/sshd tcp 0 0 0.0.0.0:10051 0.0.0.0:* LISTEN 13601/zabbix_server tcp6 0 0 :::3306 :::* LISTEN 9999/mysqld tcp6 0 0 :::22 :::* LISTEN 1131/sshd tcp6 0 0 :::10051 :::* LISTEN 13601/zabbix_server
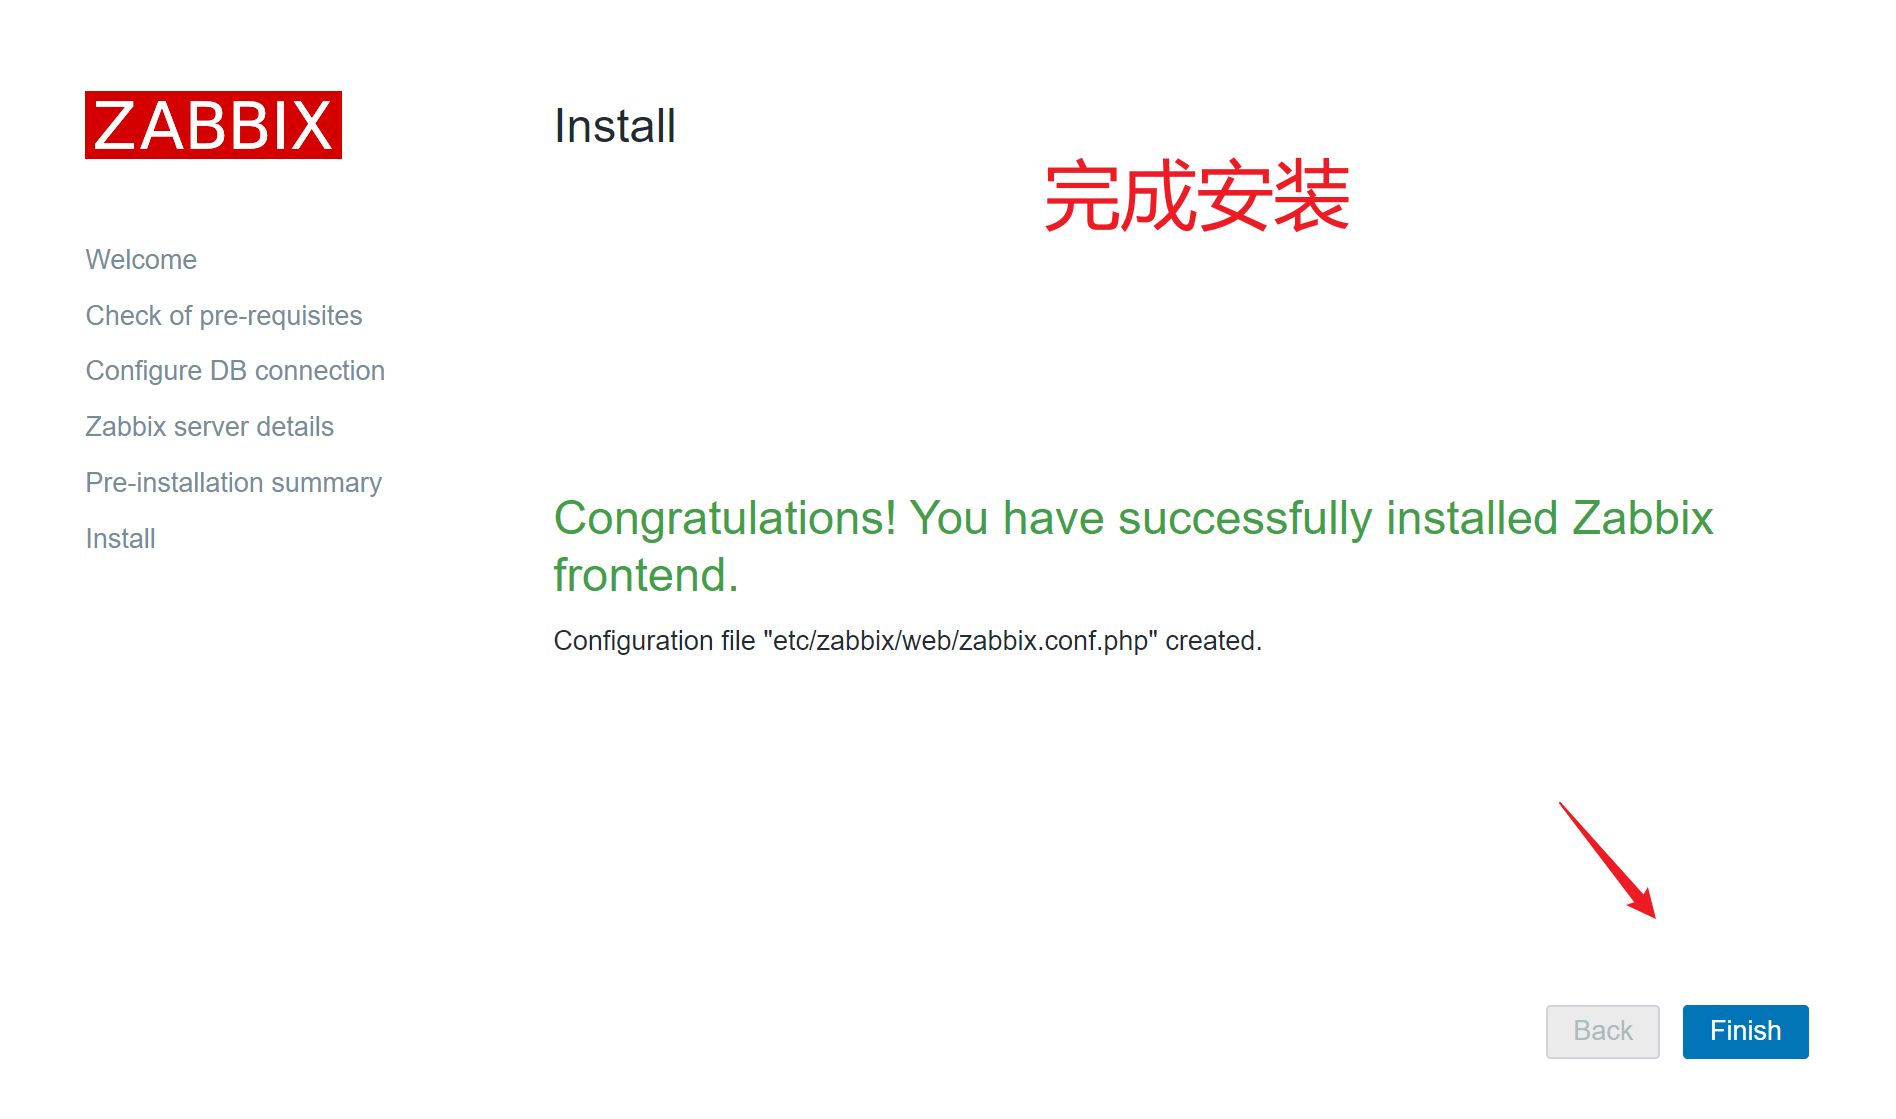
至此,zabbix-server 服务端核心程序就装好了,以及 zabbix-UI 这个php程序也装好了;
还需配置 web 前端,默认 zabbix 4.0 版本只支持 apache,不同 zabbix 版本 web 前端代理不一样(nginx、apache)
Apache 配置
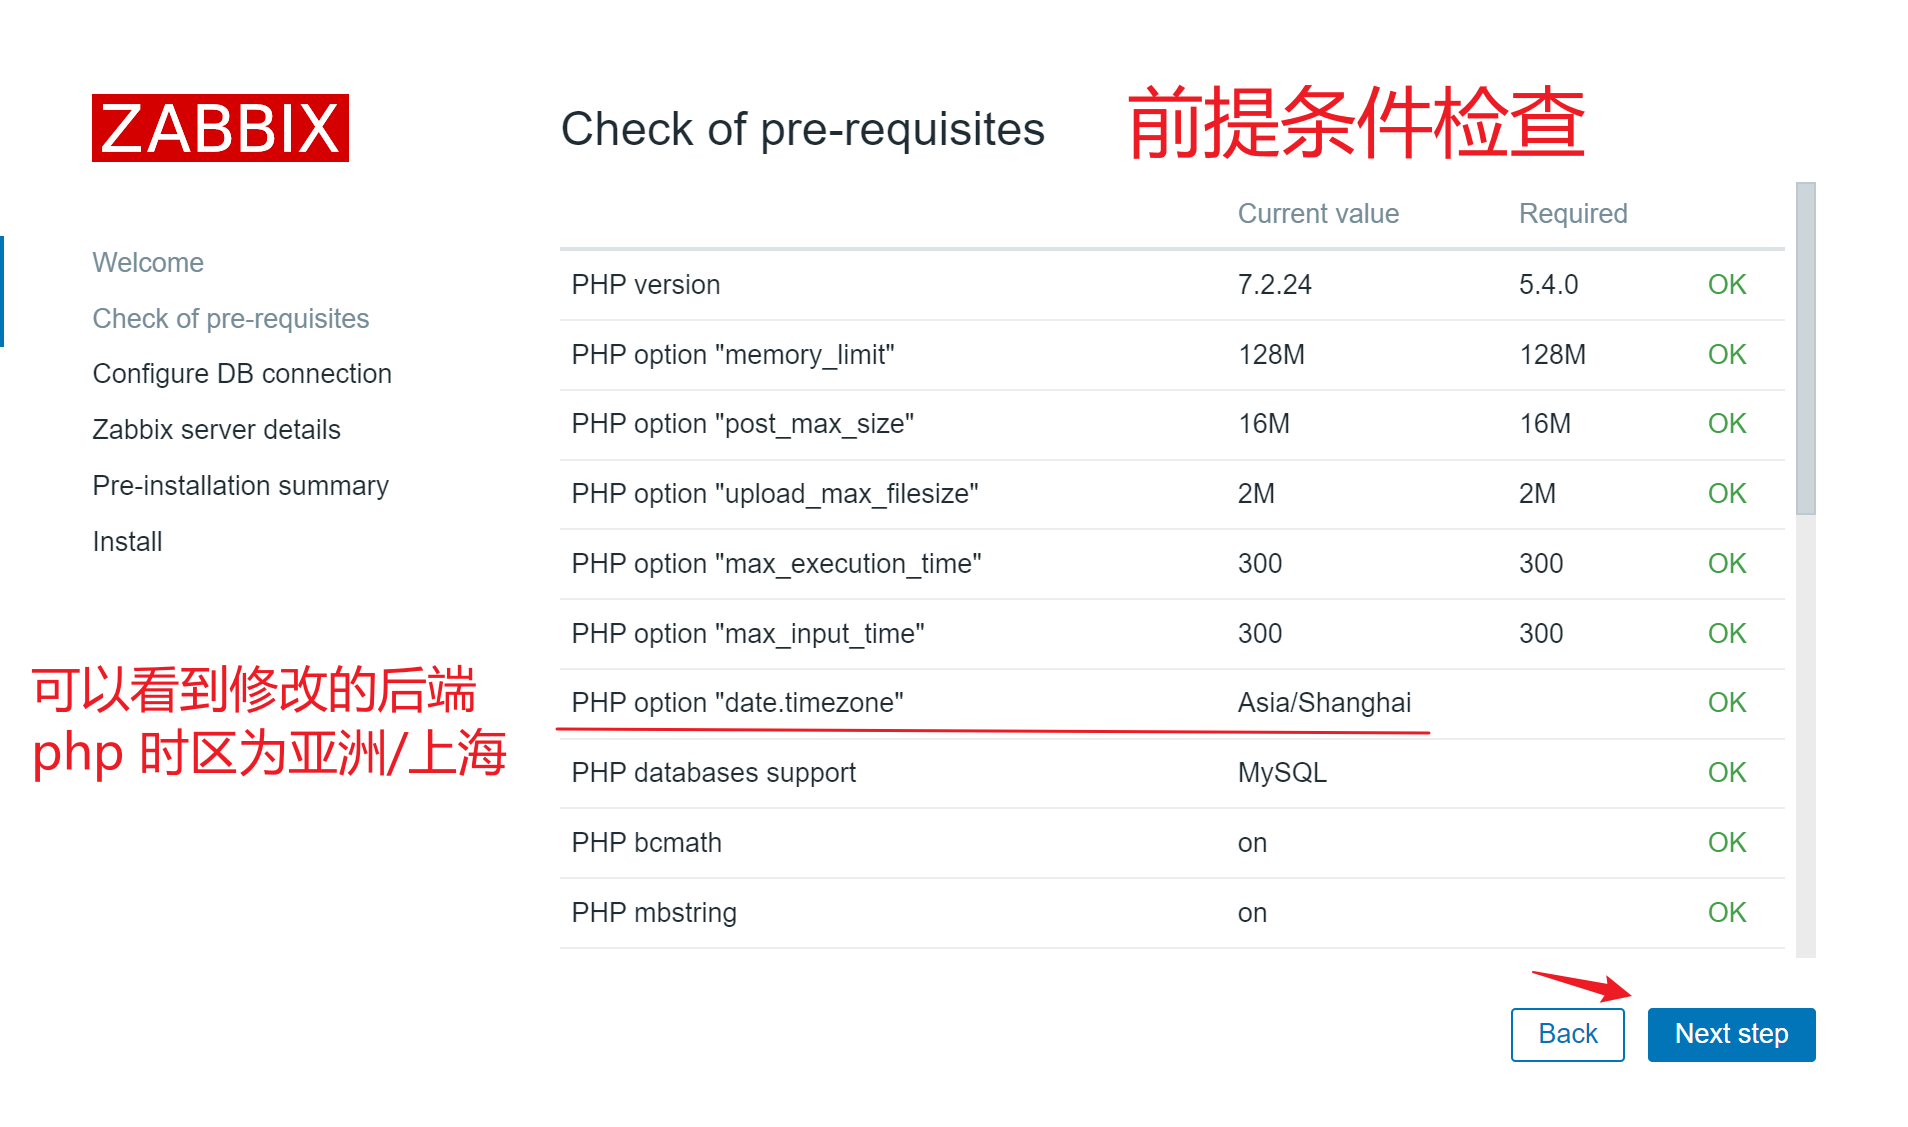
1
2
3
4
5
6
7
8
9
10
11
12
13
14
15
16
17
18
19
20
21
22
23
24
25
26
27
1.修改PHP时区 [root@stream8 ~] ... ;date.timezone = date.timezone = Asia/Shanghai 如果后续手动修改了时区,需要重启php的服务 [root@stream8 ~] 2.重启apache服务 [root@stream8 ~] ... Alias /zabbix /usr/share/zabbix 可以看到访问/zabbix,会转发到/usr/share/zabbix目录 <Directory "/usr/share/zabbix" > Options FollowSymLinks AllowOverride None Require all granted <FilesMatch \.(php|phar)$> SetHandler "proxy:unix:/run/php-fpm/zabbix.sock|fcgi://localhost" </FilesMatch> </Directory> ... [root@stream8 ~]
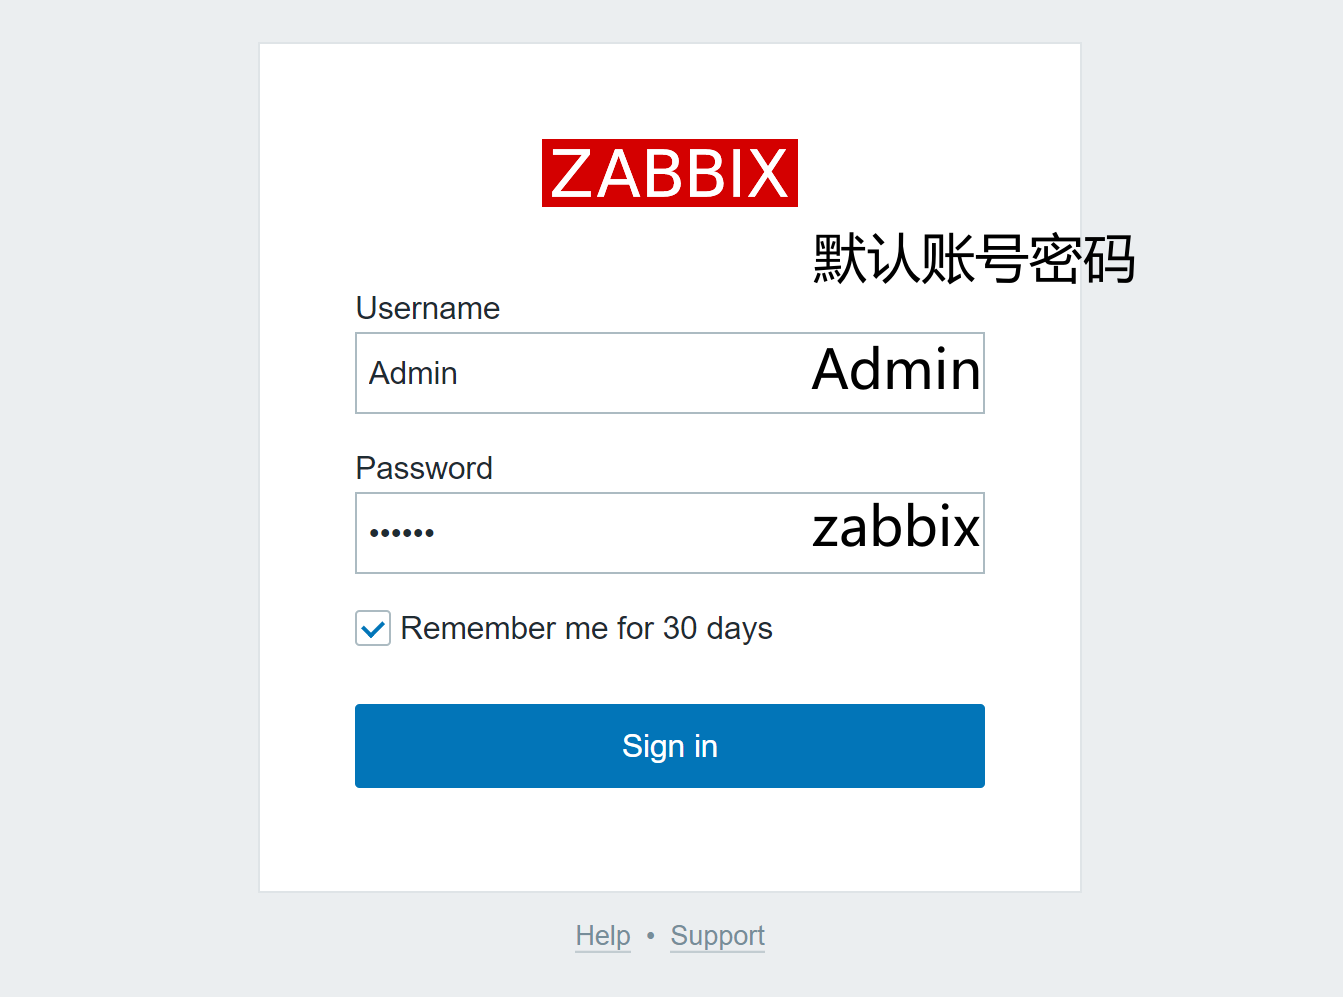
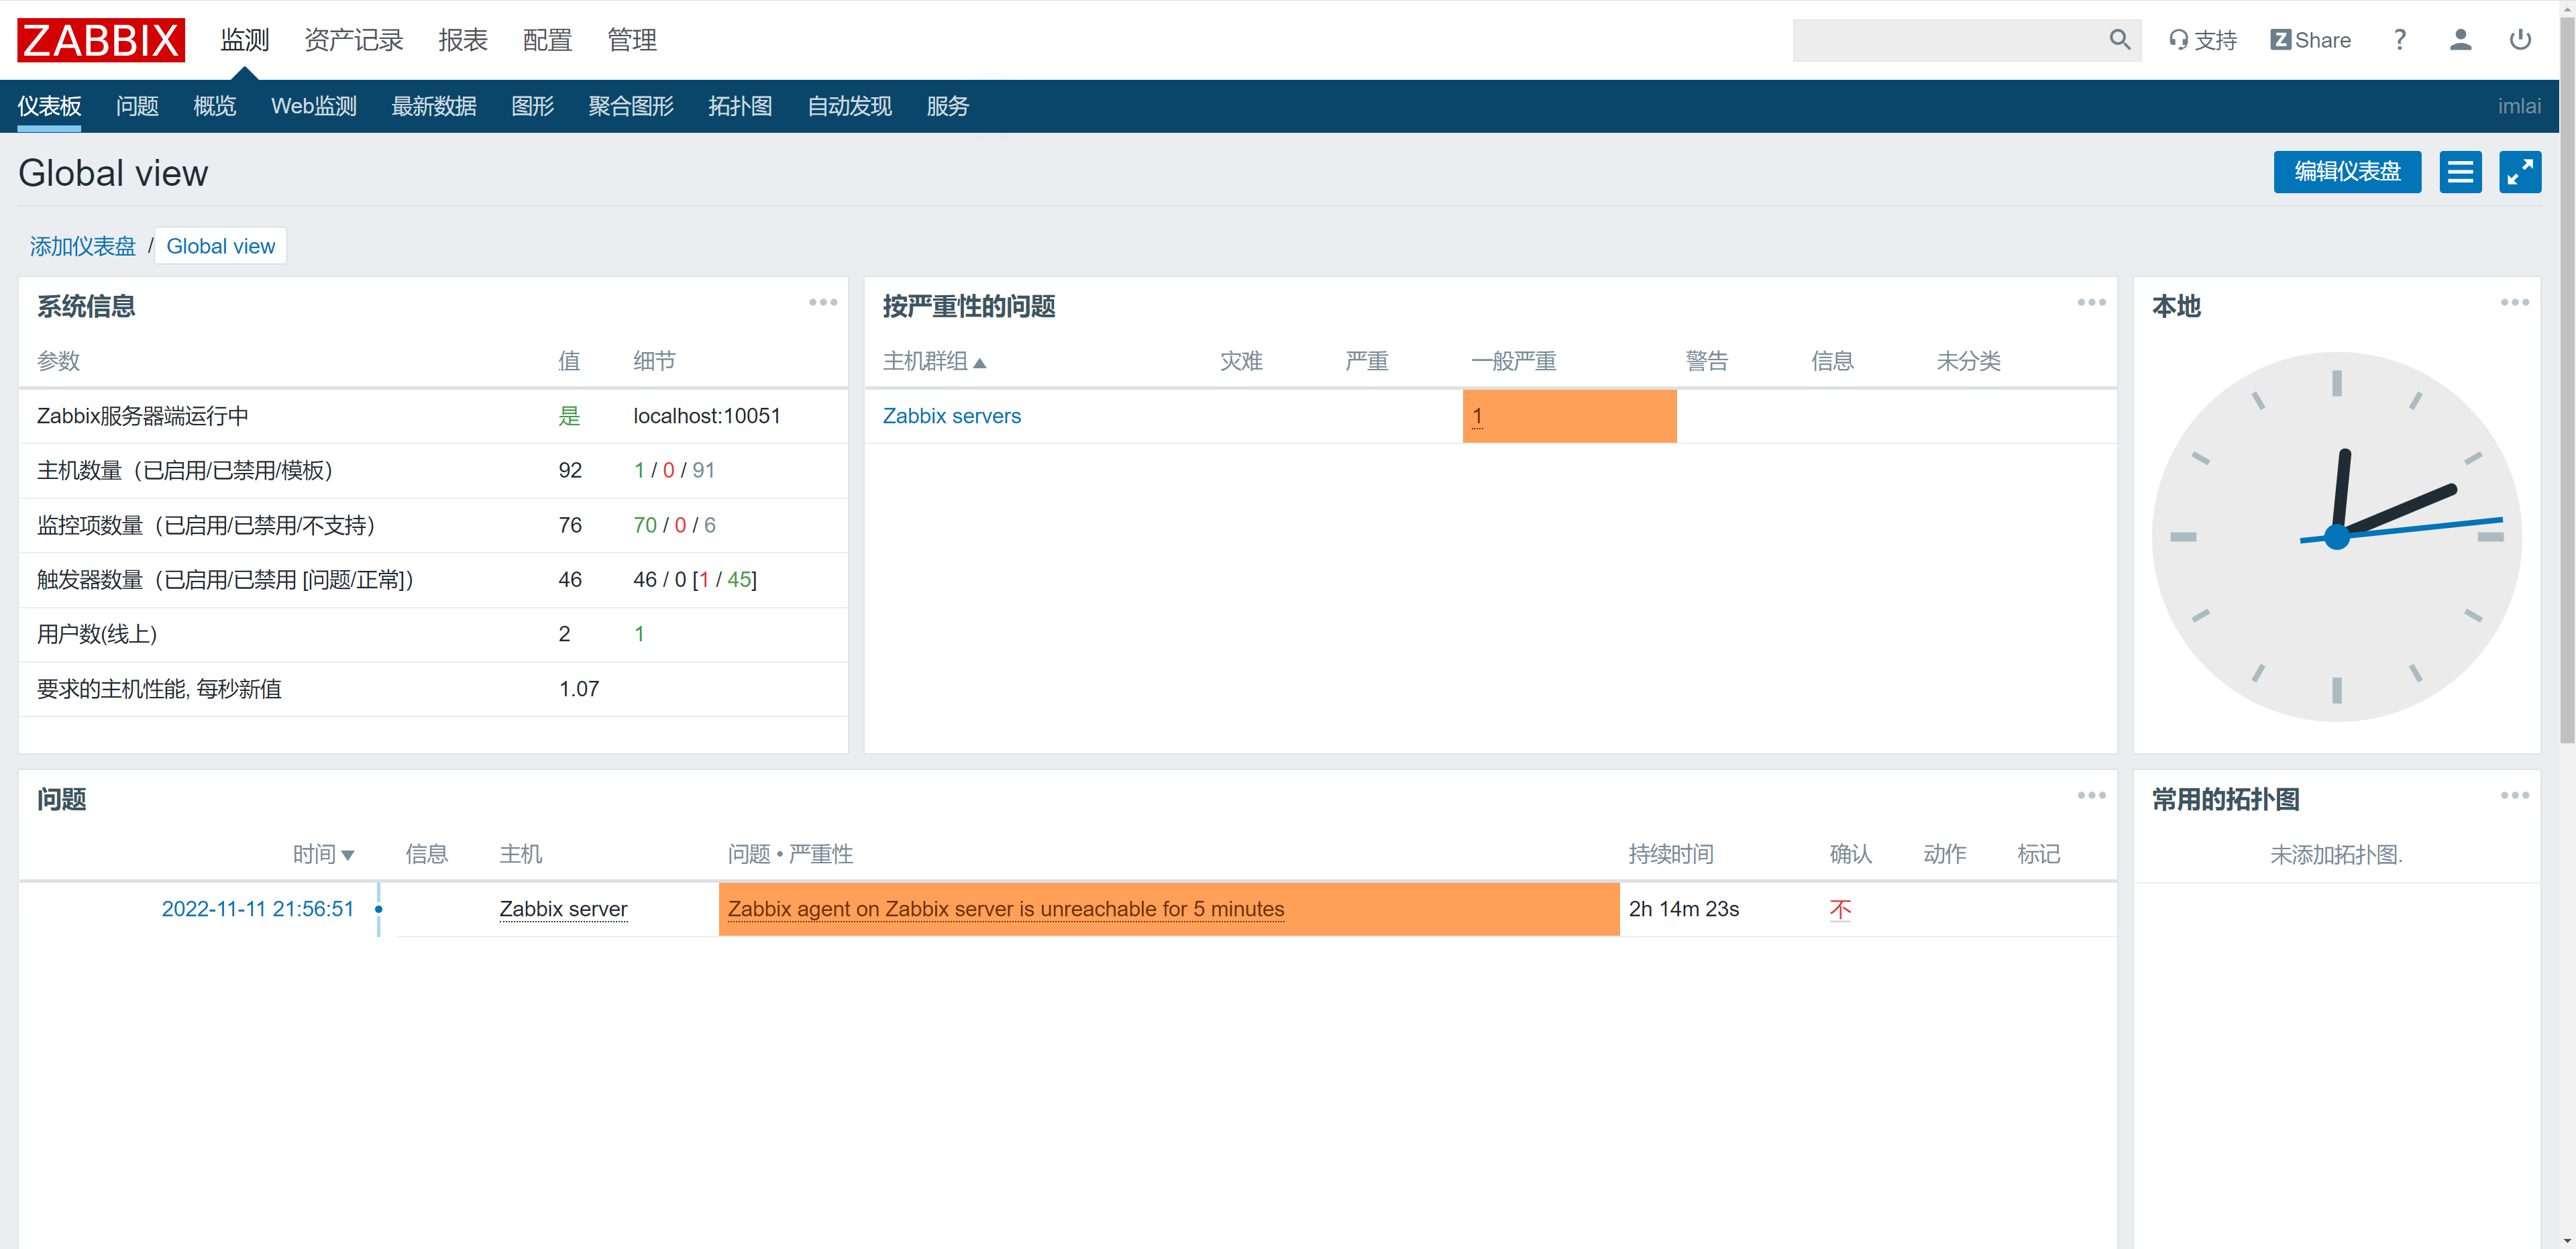
访问服务器的IP加/zabbix
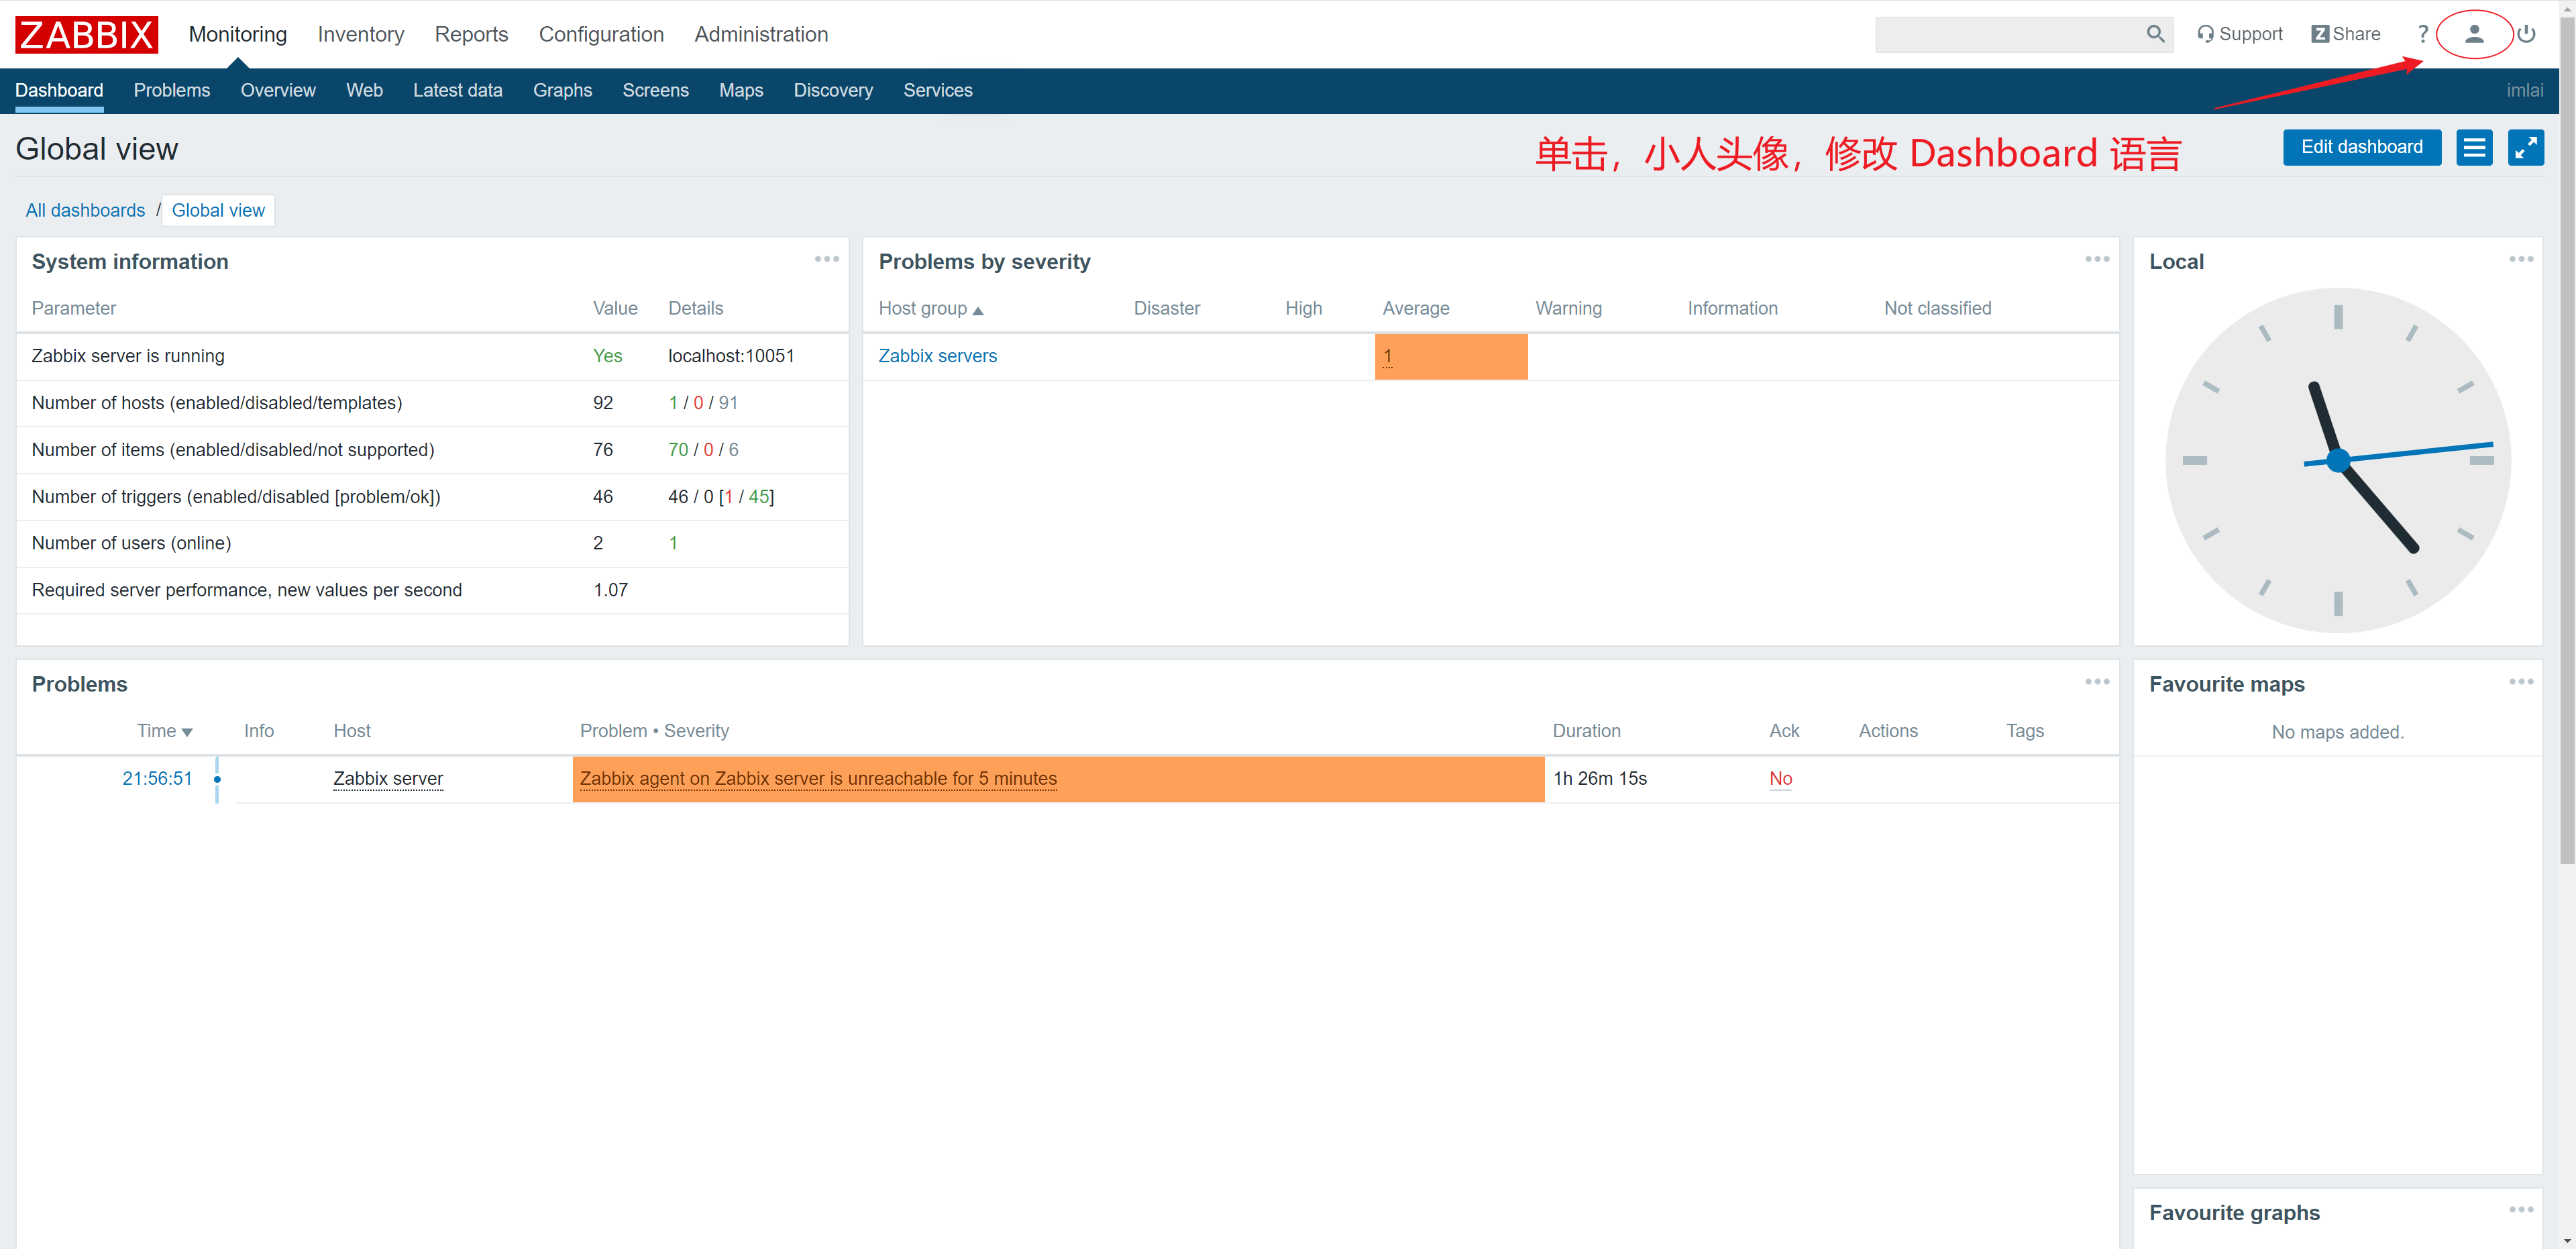
后面会教大家,如何在后端修改 Zabbix 的 Admin 用户的密码
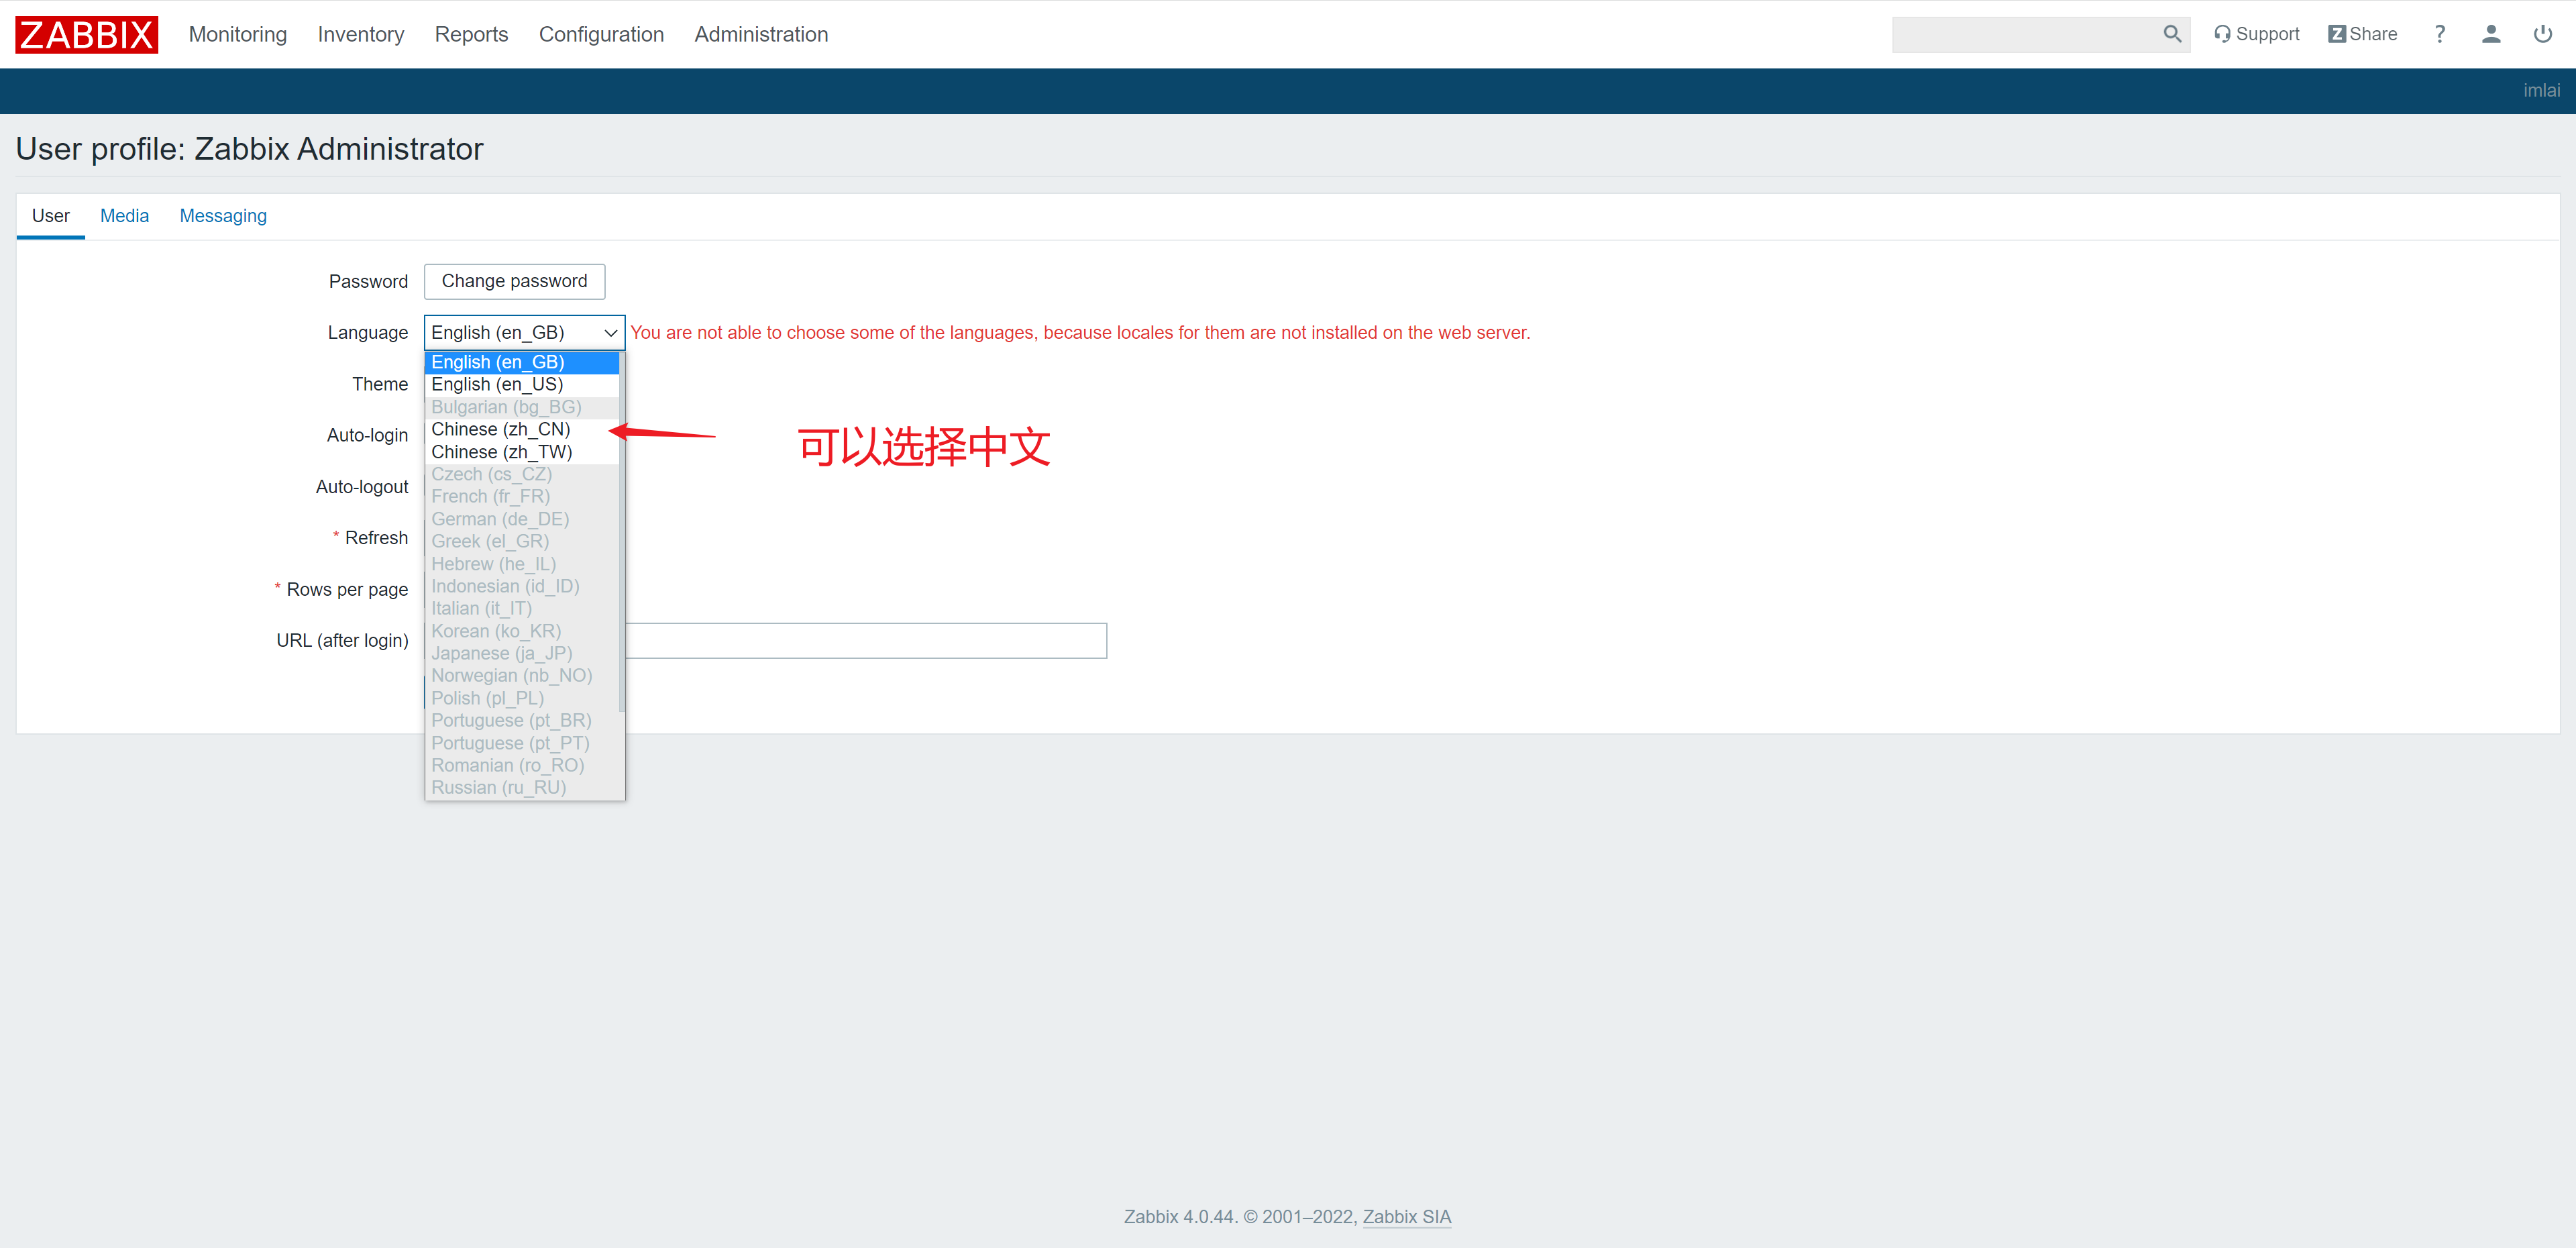
如果 web 界面不能选择使用中文,则需要手动安装中文语言包
1
2
3
4
安装zh_CN语言包 [root@stream8 ~] 然后刷新web界面,就能选择中文了
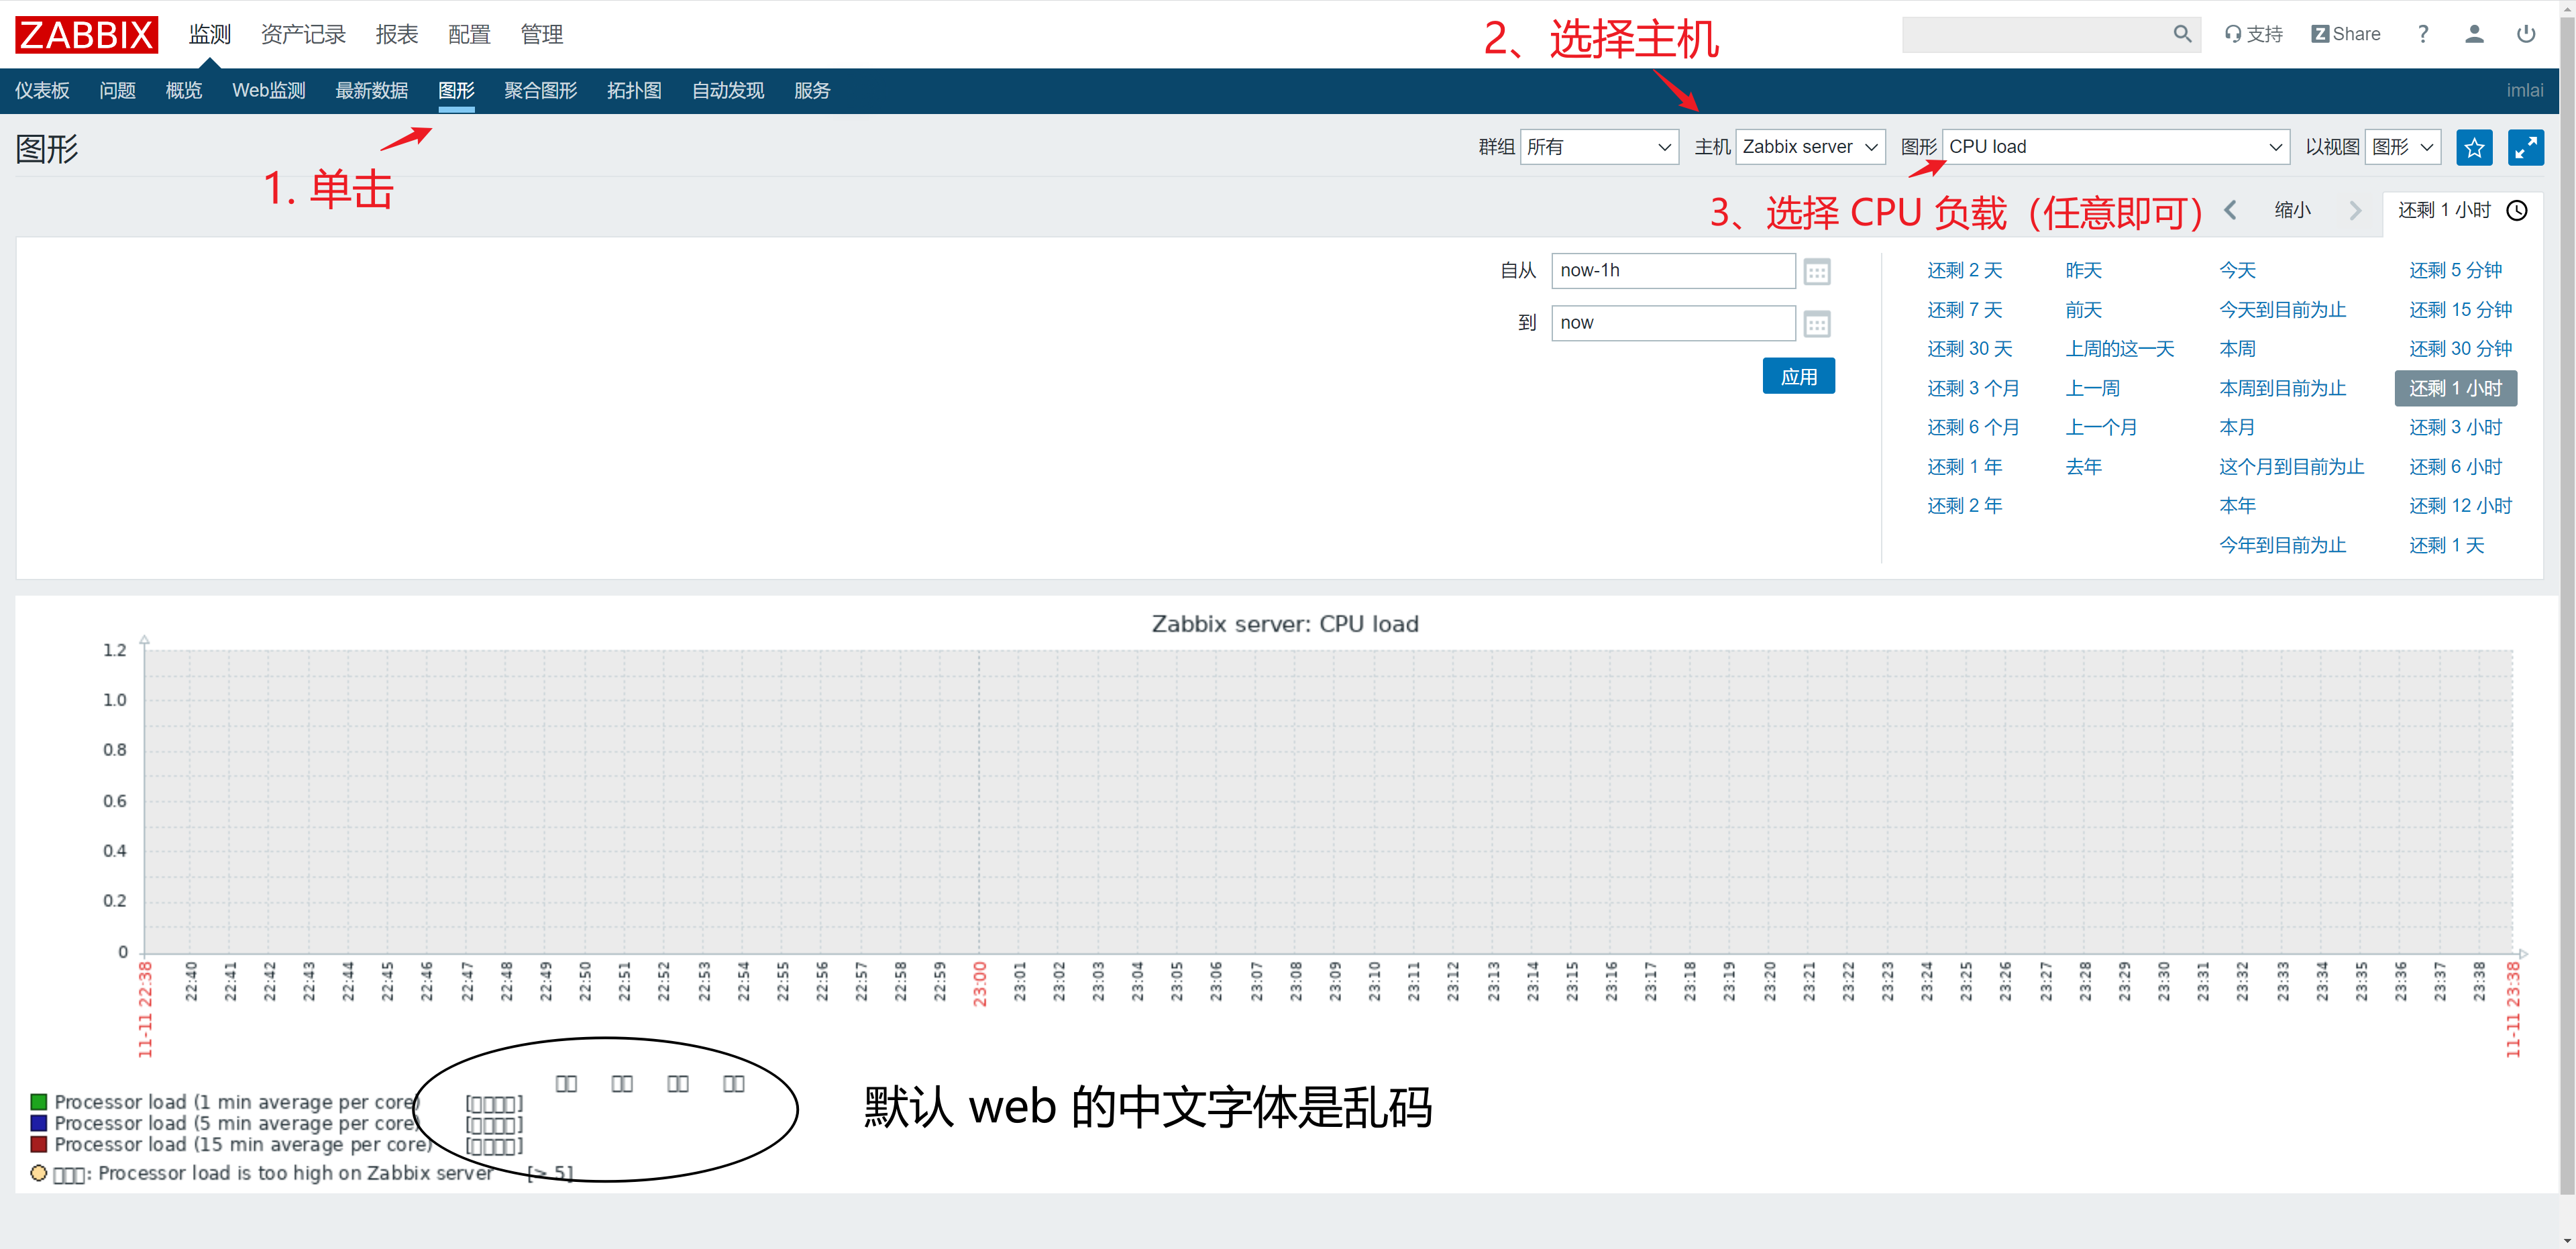
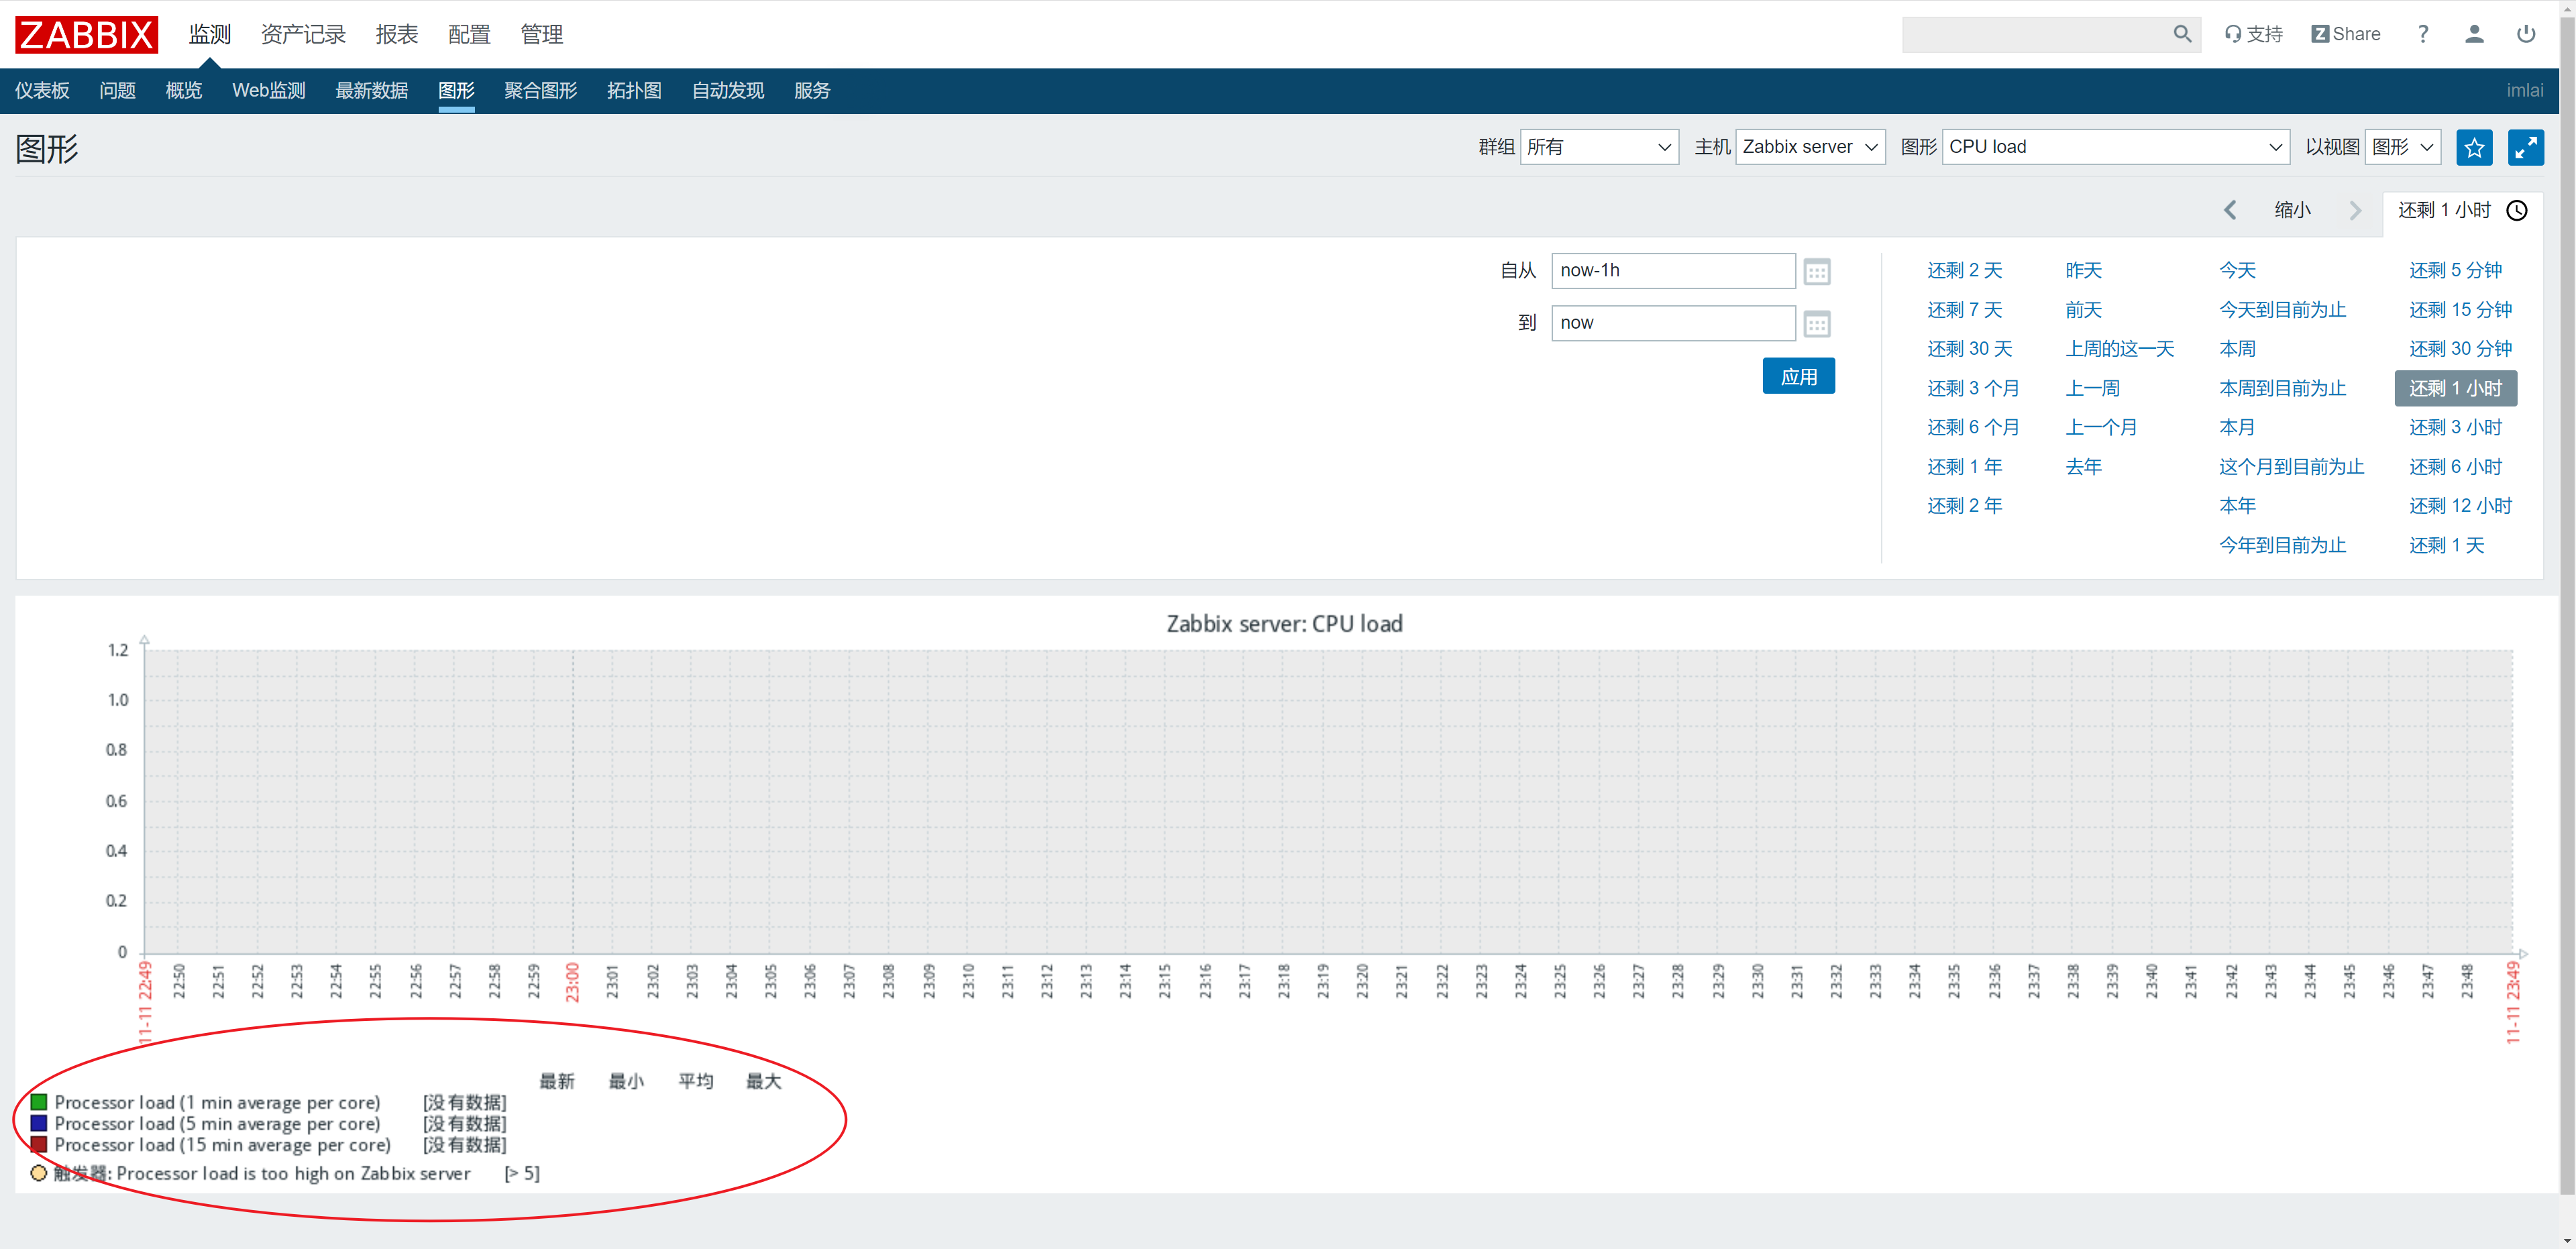
修改图形的数据展示(默认字体有问题)
1
2
3
4
5
6
7
下载字体,修改zabbix的字体支持(因为缺少zabbix所需的字体) [root@stream8 ~] [root@stream8 ~] cp : overwrite '/usr/share/zabbix/assets/fonts/graphfont.ttf' ? y
刷新 web 界面,可以看到乱码的中文字体生效了
修改 Zabbix 默认 Admin 用户的密码
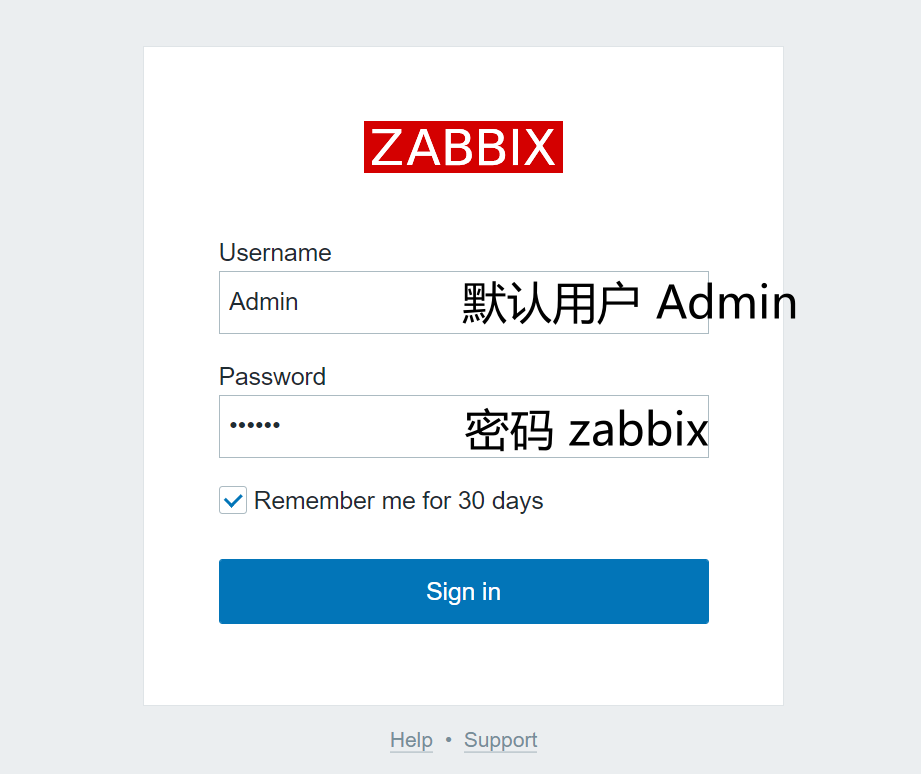
zabbix部署后,使用默认的 Admin 账户登录,密码默认是 zabbix;
数据库重置 zabbix web用户
1 2 3 4 5 6 7 8 9 10 11 12 13 14 15 16 17 18 19 20 21 22 23 24 25 首先,进入zabbix数据库,查看当前users 表的信息 [root@stream8 ~] Welcome to the MariaDB monitor. Commands end with ; or \g. Your MariaDB connection id is 385 Server version: 10.3.28-MariaDB MariaDB Server Copyright (c) 2000, 2018, Oracle, MariaDB Corporation Ab and others. Type 'help;' or '\h' for help . Type '\c' to clear the current input statement. MariaDB [(none)]> use zabbix; Reading table information for completion of table and column names You can turn off this feature to get a quicker startup with -A Database changed MariaDB [zabbix]> select * from users ; +--------+-------+--------+---------------+----------------------------------+-----+-----------+------------+-------+---------+------+---------+----------------+---------------+---------------+---------------+ | userid | alias | name | surname | passwd | url | autologin | autologout | lang | refresh | type | theme | attempt_failed | attempt_ip | attempt_clock | rows_per_page | +--------+-------+--------+---------------+----------------------------------+-----+-----------+------------+-------+---------+------+---------+----------------+---------------+---------------+---------------+ | 1 | Admin | Zabbix | Administrator | 5fce1b3e34b520afeffb37ce08c7cd66 | | 1 | 0 | zh_CN | 30s | 3 | default | 0 | 27.38.213.189 | 1668181951 | 50 | | 2 | guest | | | d41d8cd98f00b204e9800998ecf8427e | | 0 | 15m | en_GB | 30s | 1 | default | 0 | | 0 | 50 | +--------+-------+--------+---------------+----------------------------------+-----+-----------+------------+-------+---------+------+---------+----------------+---------------+---------------+---------------+ 2 rows in set (0.000 sec)
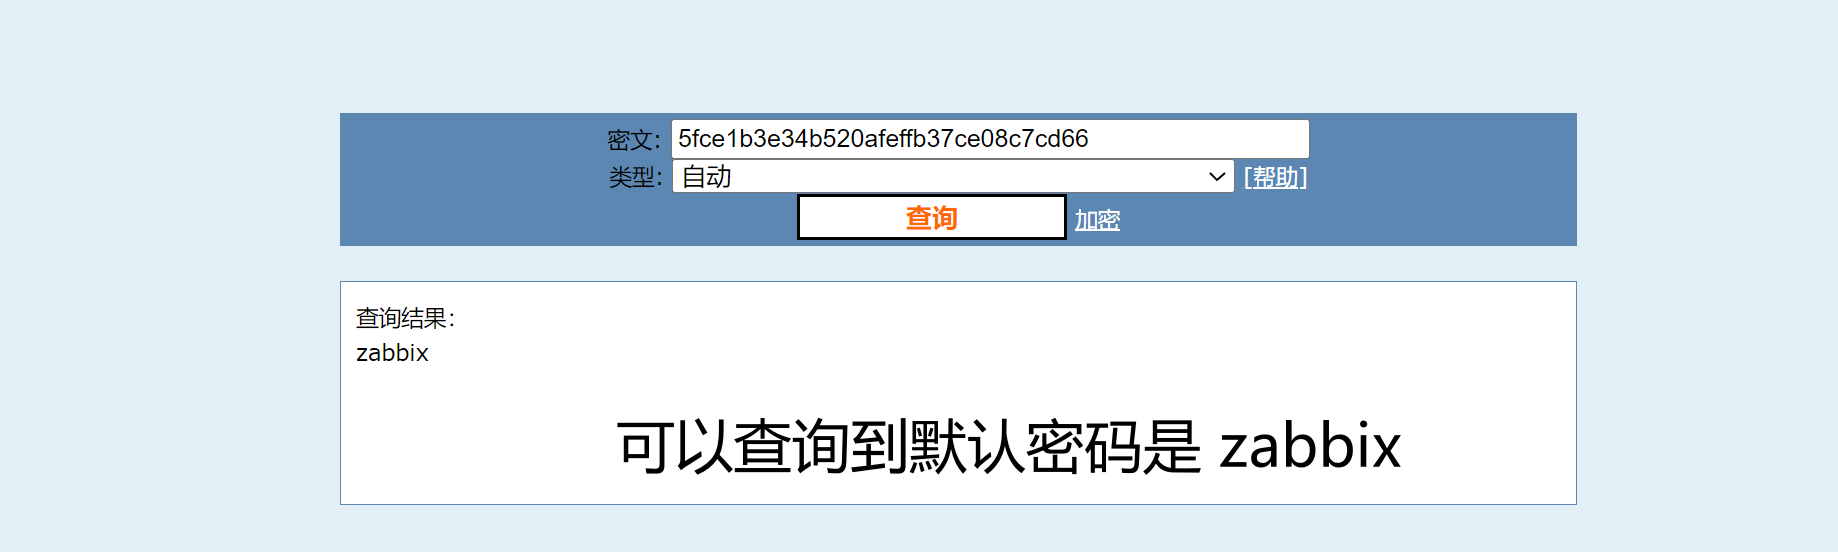
【MD5 在线加密及解密】
通过 MD5 反解 Admin 用户的数据库密码
这里学习一下在 Linux 中生成 MD5 值
1 2 3 [root@stream8 ~] (stdin)= caf22338e37c42b2f2e9358ba6bedb04
手动更新 zabbix Admin 用户的密码
1 2 3 4 5 6 7 8 9 10 11 12 13 14 15 16 17 18 19 20 21 22 23 24 设置md5的密码为'Aa123!' [root@stream8 ~] (stdin)= 675278e2a74b19cfa0a5f766424c67cc [root@stream8 ~] MariaDB [(none)]> use zabbix; MariaDB [zabbix]> update users set passwd='675278e2a74b19cfa0a5f766424c67cc' where userid = '1' ; Query OK, 1 row affected (0.003 sec) Rows matched: 1 Changed: 1 Warnings: 0 MariaDB [zabbix]> select * from users ; +--------+-------+--------+---------------+----------------------------------+-----+-----------+------------+-------+---------+------+---------+----------------+---------------+---------------+---------------+ | userid | alias | name | surname | passwd | url | autologin | autologout | lang | refresh | type | theme | attempt_failed | attempt_ip | attempt_clock | rows_per_page | +--------+-------+--------+---------------+----------------------------------+-----+-----------+------------+-------+---------+------+---------+----------------+---------------+---------------+---------------+ | 1 | Admin | Zabbix | Administrator | 675278e2a74b19cfa0a5f766424c67cc | | 1 | 0 | zh_CN | 30s | 3 | default | 0 | 27.38.213.189 | 1668181951 | 50 | | 2 | guest | | | d41d8cd98f00b204e9800998ecf8427e | | 0 | 15m | en_GB | 30s | 1 | default | 0 | | 0 | 50 | +--------+-------+--------+---------------+----------------------------------+-----+-----------+------------+-------+---------+------+---------+----------------+---------------+---------------+---------------+ 2 rows in set (0.000 sec) MariaDB [zabbix]> FLUSH PRIVILEGES; Query OK, 0 rows affected (0.000 sec)
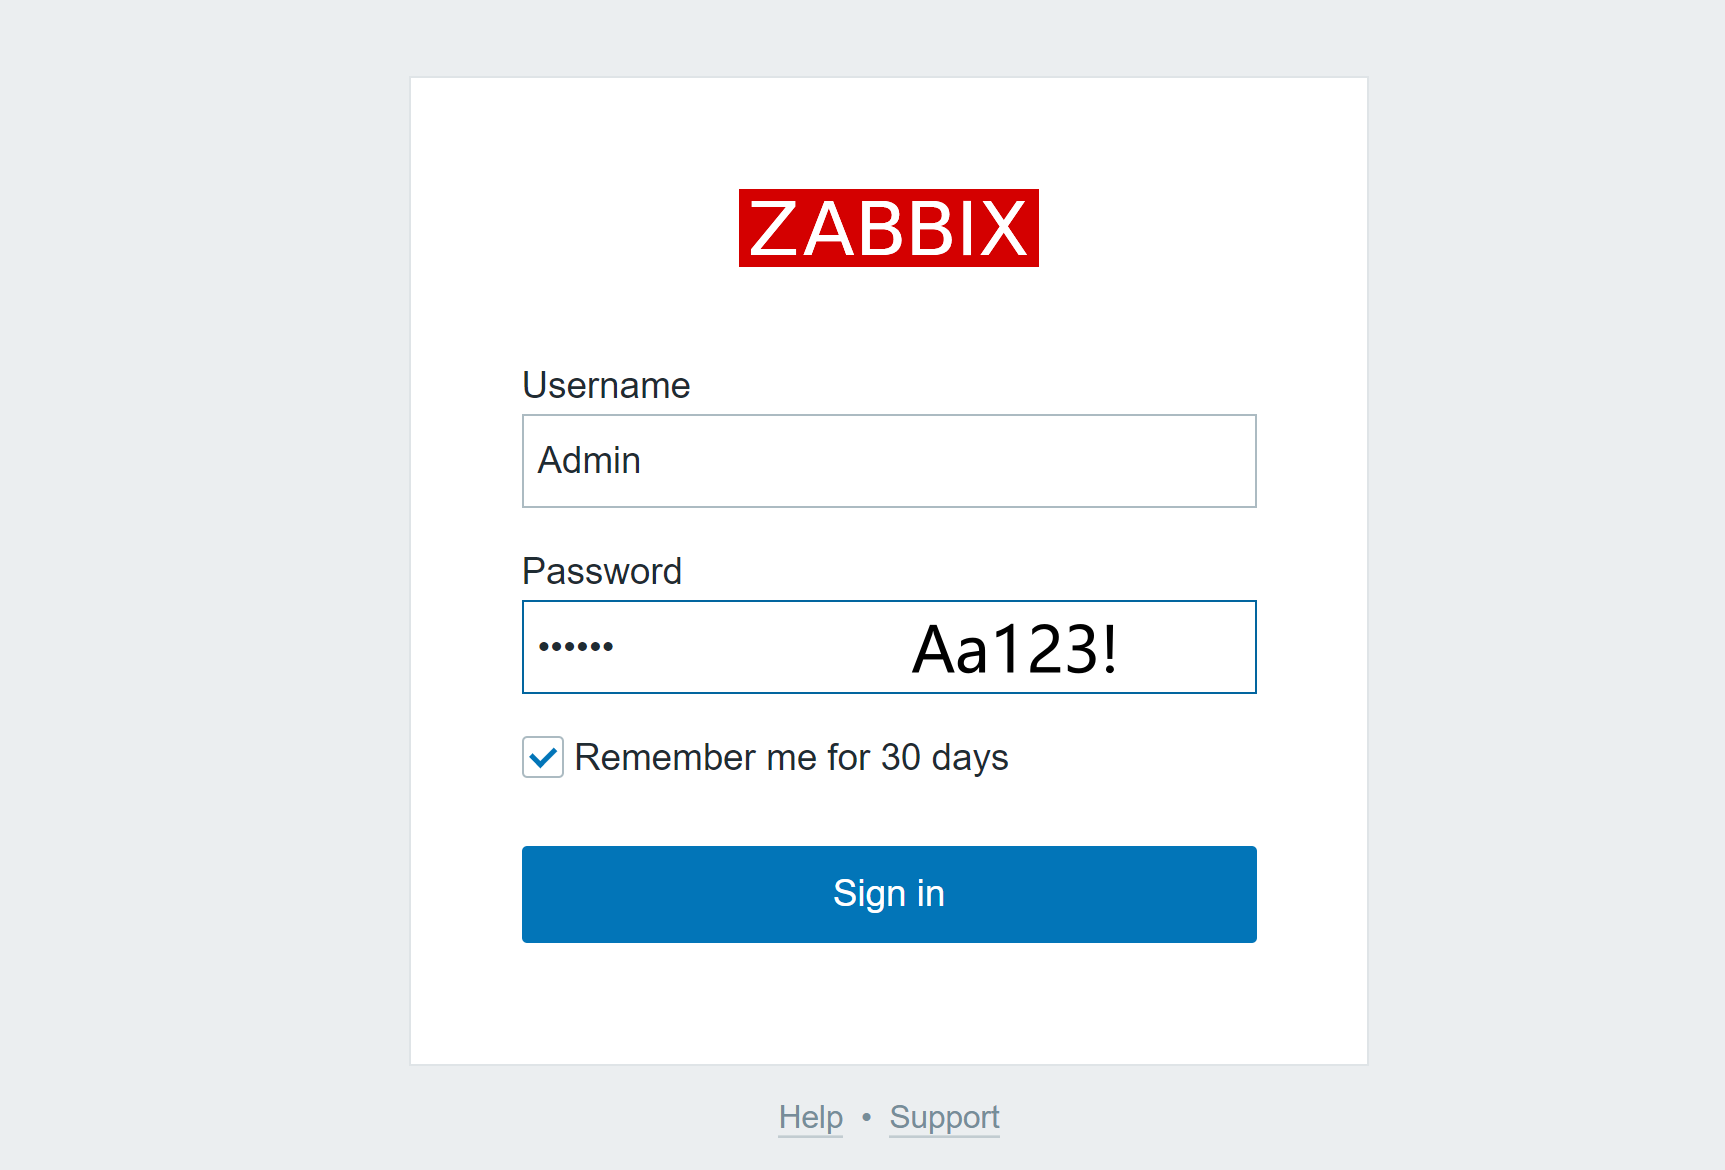
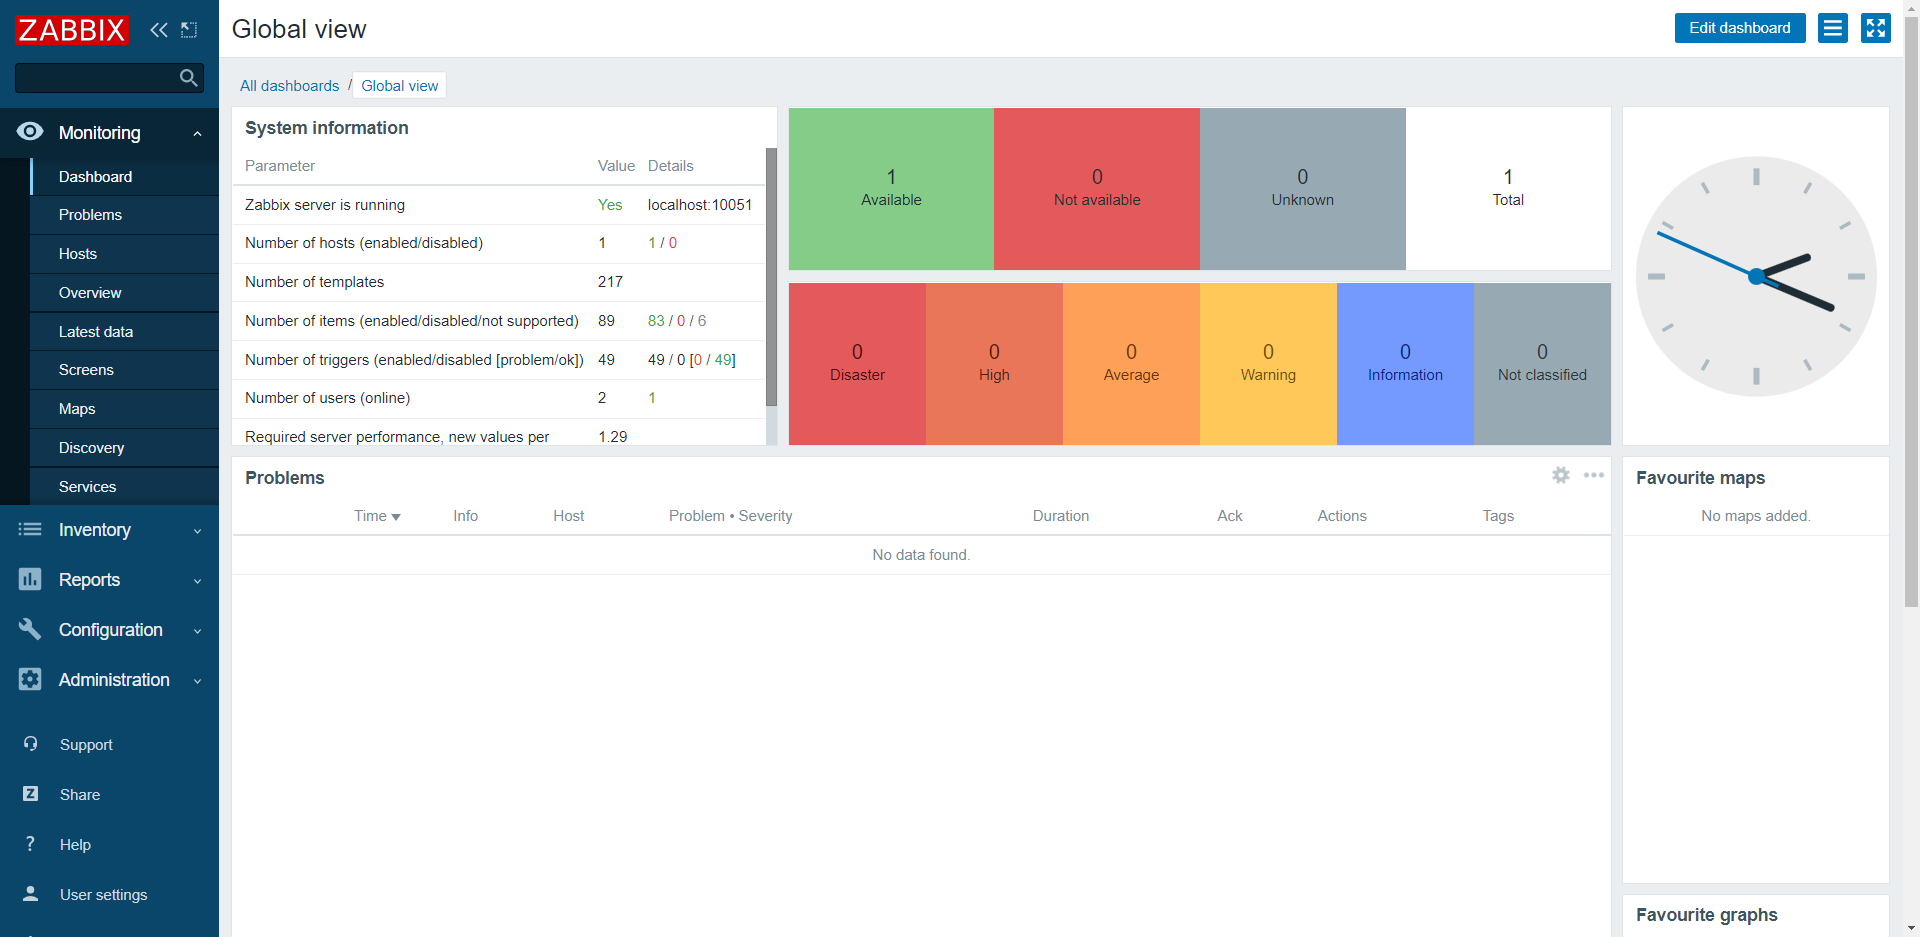
登录测试 !
安装 zabbix 5.0 版本 5.0 版本对基础环境的要求有很大的变化,最大的就是对 php 版本的要求,最低要求 7.2.0 版本,对 php 扩展组件也有要求;
详见官网:https://www.zabbix.com/documentation/5.0/zh/manual/installation/requirements
环境介绍
1 台 server,2 台 agent,系统是 CentOS Stream 8
server: 10.0.0.10/24
agent1: 10.0.0.11/24
agent2: 10.0.0.12/24
1
2
3
4
5
6
7
8
9
10
11
12
13
14
15
16
17
18
19
1.环境准备 关闭防火墙(三台机器) [root@server ~] [root@server ~] 此时获取当前selinux防火墙的安全策略仍为Enforcing,配置文件并未生效 [root@server ~] 获取zabbix的下载源 [root@server ~] 更换zabbix.repo源 [root@server ~] 2.安装zabbix server和agent [root@server ~] 3.安装zabbix前端环境 [root@server ~]
如果是 CentOS 7 版本,则需要安装 Software Collections,便于后续安装高版本的 php,默认 yum 安装的 php 版本为 5.4 过低。SCL(Software Collections)可以让你在同一个操作系统上安装和使用多个版本的软件,而不会影响整个系统的软件包。
为了避免系统广泛冲突,包安装在 /opt/rh 目录中,例如,这允许你在 CentOS 7 机器上安装 Python3.5,而不会删除或干扰 Python 2.7.
yum -y install centos-release-scl
这就是 zabbix 5.0 和 4.0 的区别之一,不过因为我们的系统是 CentOS Steam 8,直接安装 php 刚好就是 7.2 版本,所以不存在这个问题🤣
1
2
3
4
5
6
7
8
9
10
11
12
13
14
15
16
17
18
19
20
21
22
23
24
25
26
27
28
29
30
31
32
33
34
35
36
37
38
39
40
41
42
43
44
45
46
47
48
49
50
51
52
53
54
55
56
57
58
59
60
61
62
63
64
65
66
67
68
69
70
71
72
73
74
75
76
77
78
79
80
81
82
4.安裝zabbix所需的数据库 [root@server ~] 5.配置数据库 [root@server ~] 初始化数据库,设置密码 [root@server ~] ... Enter current password for root (enter for none): 【回车,默认是空】 OK, successfully used password, moving on... Set root password? [Y/n] y 【设置root密码】 New password: 【redhat】 Re-enter new password: 【redhat】 Password updated successfully! Remove anonymous users ? [Y/n] y 【Y,移除匿名用户】 ... Success! Disallow root login remotely? [Y/n] n 【n,不禁止root远程登录】 ... skipping. Remove test database and access to it? [Y/n] y 【Y,删除test 数据库】 - Dropping test database... ... Success! - Removing privileges on test database... ... Success! Reload privilege tables now? [Y/n] y 【Y,确认刷新授权表】 ... Success! 登录数据库 [root@server ~] 创建zabbix数据库 MariaDB [(none)]> create database zabbix character set utf8 collate utf8_bin; Query OK, 1 row affected (0.001 sec) 添加数据库用户,以及zabbix所需的数据库信息 MariaDB [(none)]> create user zabbix@localhost identified by "redhat" ; Query OK, 0 rows affected (0.001 sec) MariaDB [(none)]> grant all privileges on zabbix.* to zabbix@localhost; Query OK, 0 rows affected (0.001 sec) MariaDB [(none)]> flush privileges; MariaDB [(none)]> exit Bye 6.使用zabbix-mysql命令,导入数据库信息 [root@server ~] [root@server ~] | users | | users_groups | | usrgrp | | valuemaps | | widget | | widget_field | +----------------------------+ 7.修改zabbix server配置文件,修改数据库密码 [root@server ~] ... DBPassword=redhat 8.修改zabbix的php配置文件 [root@server ~] ; php_value[date.timezone] = Europe/Riga php_value[date.timezone] = Asia/Shanghai 9.启动zabbix服务 [root@server ~] php-fpm.service.d [root@server ~] [root@server ~] 10.访问zabbix界面,和4.0一致,IP + /zabbix
后续步骤参考 zabbix4.0