搭建私有仓库,上传 tensorflow 镜像 ① 配置网络,能连通外网
② 安装docker
参考上篇的云容器平台实战,此处省略。。。
③ cc网下载 images.zip文件,上传 images文件 (scp,WinSCP,XFTP,SecureCRT)
先在物理机解压,再上传image文件 👇
scp -r images root@192.168.169.10:/root
④ 将registry_latest.tar映像导入
1
2
3
[root@localhost ~] 查看registry映像 [root@localhost ~]
⑤创建一个 registry 容器
1
2
3
4
[root@localhost ~] 查看容器 [root@localhost ~]
⑥ 配置仓库地址
1
2
3
4
5
6
7
8
9
10
11
12
13
14
15
[root@localhost ~] { "insecure-registries" : ["192.168.169.10:5000" ] } 重新加载模块、重启docker [root@localhost ~] [root@localhost ~] 访问测试 [root@localhost ~] <a href="/v2/" >Moved Permanently</a>. [root@localhost ~] {"repositories" :[]}
⑦ 上传 TensorFlow 镜像
1
2
3
4
5
6
7
8
9
10
11
12
13
14
下载tensorflow镜像 [root@localhost ~] 查看tensorflow镜像 [root@localhost ~] REPOSITORY TAG IMAGE ID CREATED SIZE daocloud.io/daocloud/tensorflow 1.14.0-py3-jupyter fe3f97fcb6ce 3 years ago 1.34 GB ... 给tensorflow打标签 [root@localhost ~] 上传镜像到私有仓库 [root@localhost ~]
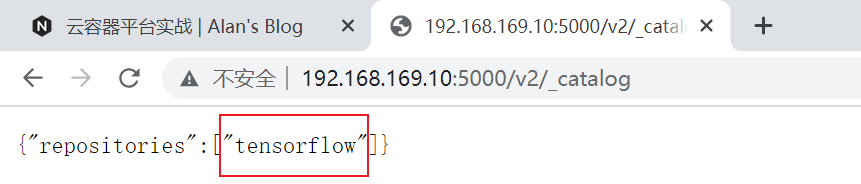
⑧ 访问测试
浏览器 http://192.168.169.10:5000/v2/_catalog
识别手写数字 ① 创建 tensorflow 容器
1
2
3
4
5
6
[root@localhost ~] ...output omitted... Or copy and paste one of these URLs: http://(480dd667b304 or 127.0.0.1):8888/?token=a6a8f826b5fc2e2142bd2643930b68bebf6ae790e53cd1d8 访问 👉 http://'IP地址' :8888/?token=a6a8f826b5fc2e2142bd2643930b68bebf6ae790e53cd1d8

② 上传mnist.npz和手写数字
③ 编写模拟训练程序
1
2
3
4
5
6
7
8
9
10
11
12
13
14
15
16
17
18
19
20
21
22
23
24
25
26
27
28
29
30
31
import tensorflow as tfimport numpy as npdata=np.load('mnist.npz' ) x_train,y_train,x_test,y_test=data['x_train' ],data['y_train' ],data['x_test' ],data['y_test' ] x_train = tf.keras.utils.normalize(x_train,axis=1 ) x_test = tf.keras.utils.normalize(x_test,axis=1 ) model = tf.keras.models.Sequential() model.add(tf.keras.layers.Flatten(input_shape=(28 ,28 ))) model.add(tf.keras.layers.Dense(999 ,activation=tf.nn.relu)) model.add(tf.keras.layers.Dense(999 ,activation=tf.nn.relu)) model.add(tf.keras.layers.Dense(10 ,activation=tf.nn.softmax)) model.compile (optimizer='adam' , loss='sparse_categorical_crossentropy' , metrics=['accuracy' ]) model.fit(x_train,y_train,epochs=3 ) val_loss,val_acc=model.evaluate(x_test,y_test) print (val_loss)print (val_acc)model.save('my_model.h5' ) model.summary()
④ 安装imageio
1 pip install --upgrade pip
1 pip install imageio -i https://pypi.douban.com/simple/
⑤ 导入测试图片
1
2
3
4
5
6
7
8
9
10
import globimport imageioimport numpy as npimg_data = [] for image_file_name in glob.glob('img_?.jpg' ): print ("loading ..." ,image_file_name) img_array = imageio.imread(image_file_name,as_gray=True ) img_data.append((255.0 - img_array.reshape(784 )) / 255.0 ) self_data = np.array(img_data).reshape(len (img_data),28 ,28 )
⑥ 进行预测
1
2
3
4
5
6
7
8
9
10
11
12
13
14
15
16
import numpy as npimport matplotlib.pyplot as pltpre = model.predict(self_data) predit=[0 for x in range (10 )] predit[0 ]=np.argmax(pre[9 ]) predit[1 ]=np.argmax(pre[8 ]) predit[2 ]=np.argmax(pre[7 ]) predit[3 ]=np.argmax(pre[6 ]) predit[4 ]=np.argmax(pre[5 ]) predit[5 ]=np.argmax(pre[4 ]) predit[6 ]=np.argmax(pre[3 ]) predit[7 ]=np.argmax(pre[2 ]) predit[8 ]=np.argmax(pre[1 ]) predit[9 ]=np.argmax(pre[0 ]) print (predit)